Open the canonical periods
The PeriodO client runs in your browser. You can use it to browse or edit any dataset that conforms to the PeriodO data model. But most people are probably interested in looking at the canonical dataset of periods curated by the PeriodO project.
When you first open the client, you are prompted to select an existing data source or specify the location of a new data source. The client supports loading data from three kinds of sources:
A web source is a URL (web address starting with
https). Data loaded from the web (including the canonical dataset) can only be browsed, not directly edited.A file source is a local (on your computer) JSON file. Data loaded from files are also browse-only.
An in-browser source is a database running in your browser. Data from an in-browser source can be edited as well as browsed.
Initially you should see only one data source: the canonical PeriodO dataset (the one downloadable at http://n2t.net/ark:/99152/p0d.json).
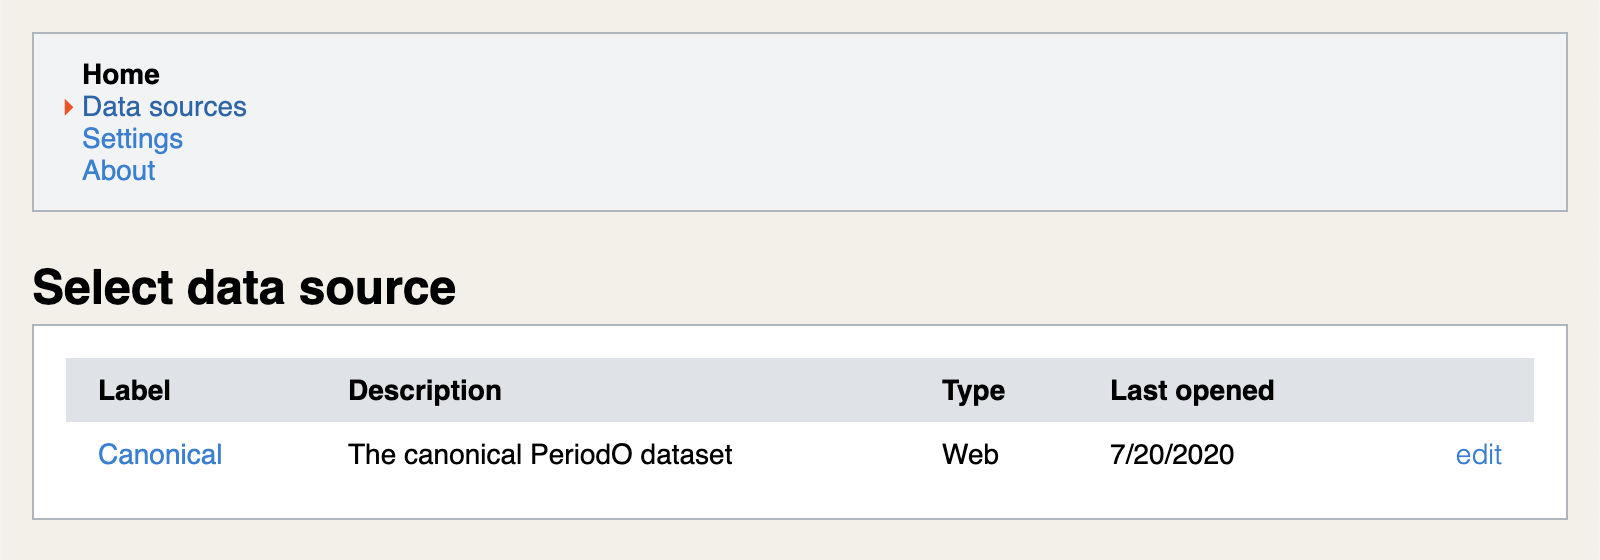
Clicking on the name of the data source (Canonical) will load its data into the client and show the Browse periods page.
Select periods of interest
At the top of the Browse periods page you can set some filters to select the set of periods you’re interested in looking at. Each filter changes the currently selected set of periods.
To select periods by name or label, enter some text in the search box under Filter periods > By label. If the Match labels option is selected, only periods with preferred (original) labels matching the entered text will be selected. If the Match labels + alternate labels option is selected, periods with alternate (translated) labels matching the entered text will also be selected.
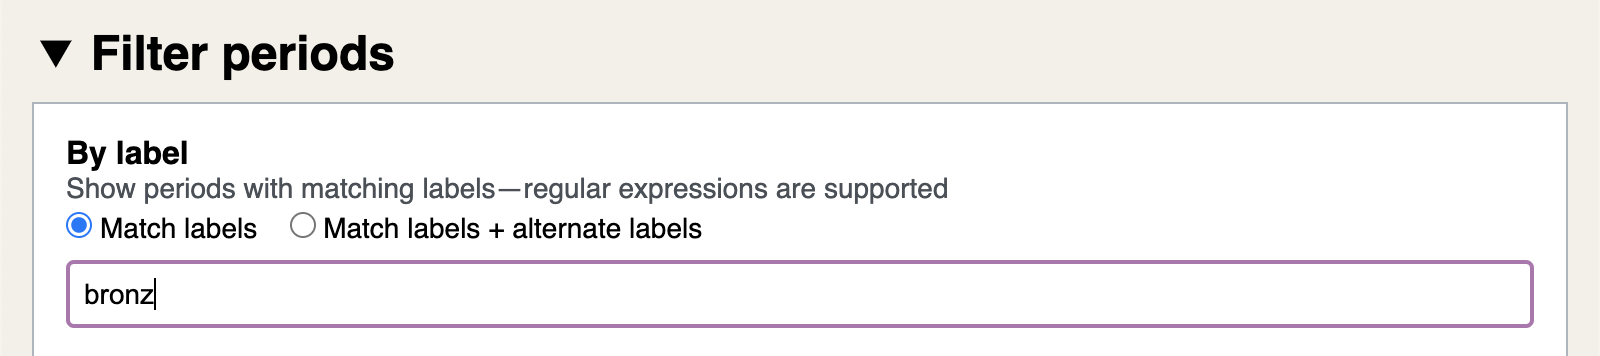
bronz in their labels
You can also use regular expressions to select periods by label.

plague or pandemic in their labels
To select periods that start within a specific range of time, you can use the By time filter. By default Browse periods only shows periods that start after 50,000 BC, since the very long time periods of the distant past are difficult to visualize alongside the shorter periods of human history. Drag the slider handles at each end of selected range to change it.

To select periods related to specific places, you have two options. The first option is to select periods that PeriodO curators have explicitly linked to places identified in Wikidata. The second option is to select periods based on how the of the period was described by the source authority.
To select periods that PeriodO curators have linked to Wikidata places, click or tap Select places under Filter periods > By place. A map and a search box will appear.

Enter some text to see a list of matching place names. Select a place name to add it to the selection. Adding multiple places to the selection will show periods linked to any of those places. To remove a place from the selection, click the X following the place name, or use Tab to highlight the place name and then press Delete. The spatial coverage of the places in the selection will be shown on the map until you click Done.
To select periods based on how the spatial coverage of the period was described by the source authority, use the Spatial coverage facet list under By authority, language or spatial coverage. These three facet lists all work similarly. Each facet list shows—with respect to some property (or facet ) of the PeriodO data model—all the different values that the periods in the currently selected set have associated with that property.
The number or count before each value shows the number of periods in the currently selected set that have that particular value associated with them. Clicking on a value in the list will narrow the currently selected set of periods to show only the periods having that value. Clicking multiple values will select periods having any of the selected values. If any values in a facet list are selected, the count before each unselected value is the number of periods that would be added to the selected set if that value were to be selected. Click a selected value again to unselect it. Click Clear to unselect all the selected values.
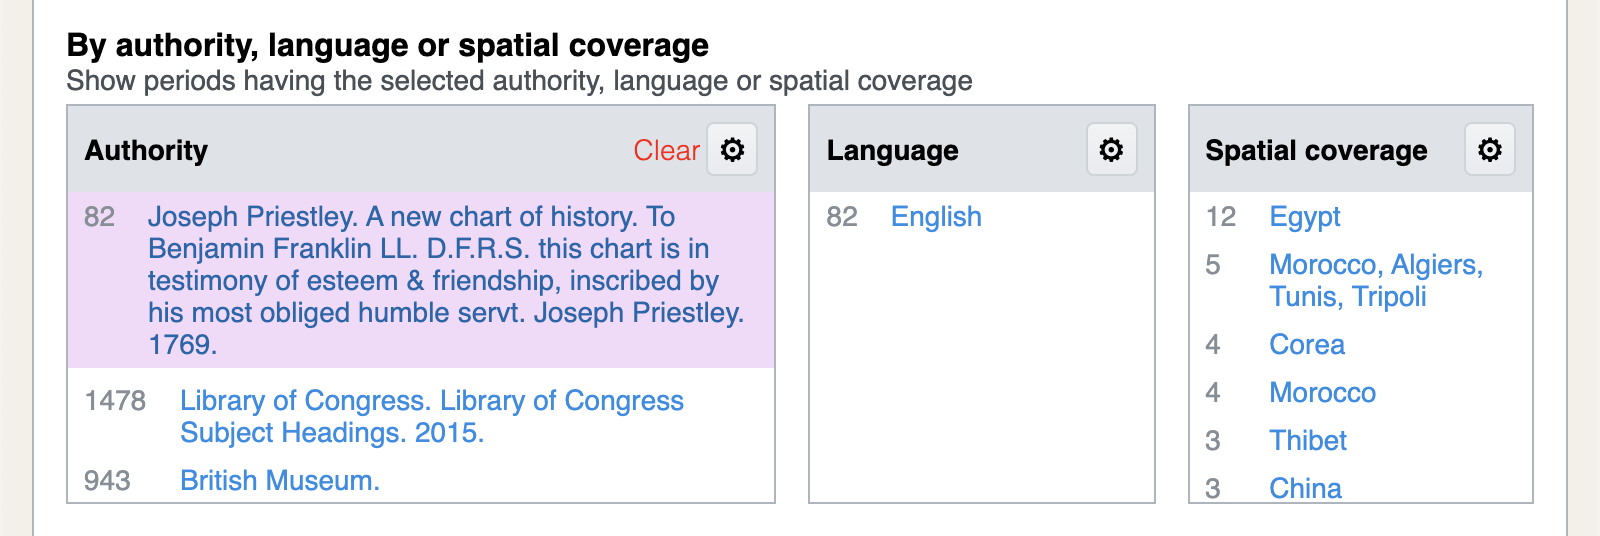
For example, if Joseph Priestley. A new chart of history is selected in the Authority facet list, the Spatial coverage facet list will show all the different ways that Priestley described the spatial coverages of the periods in his chart. The list is ordered by count, with the most common spatial coverage description first and the least common one last.
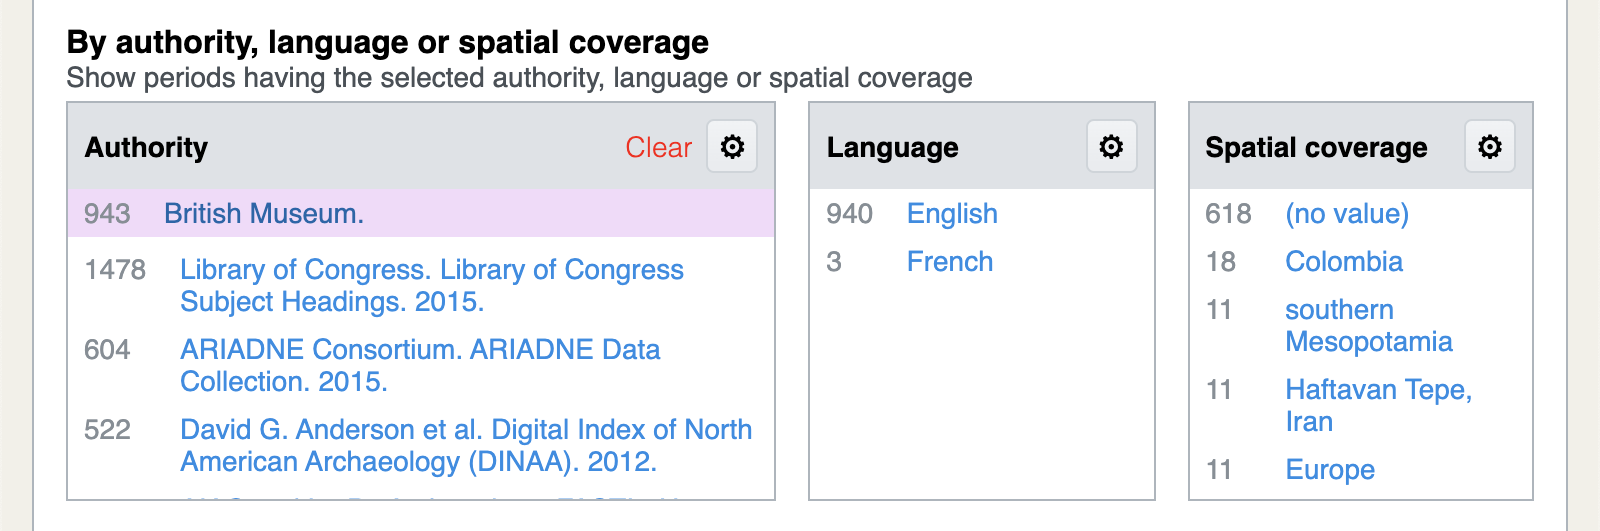
Note that the most common spatial coverage description is (no value)! Some source authorities, such as the British Museum, do not explicitly describe the spatial coverage of their periods. This is one reason why PeriodO curators augment the source authority’s spatial coverage description with links to Wikidata places.
To look for a specific value in a facet list, it is easier if the list is ordered alphabetically: click the ⚙ button at the top of the list and select Order by label.
The Spatial coverage facet can also be used to select periods that PeriodO curators have linked to Wikidata places. To see all the different Wikidata places linked to periods in the currently selected set, click the ⚙ button at the top of the list and select Use spatial coverage linked places.
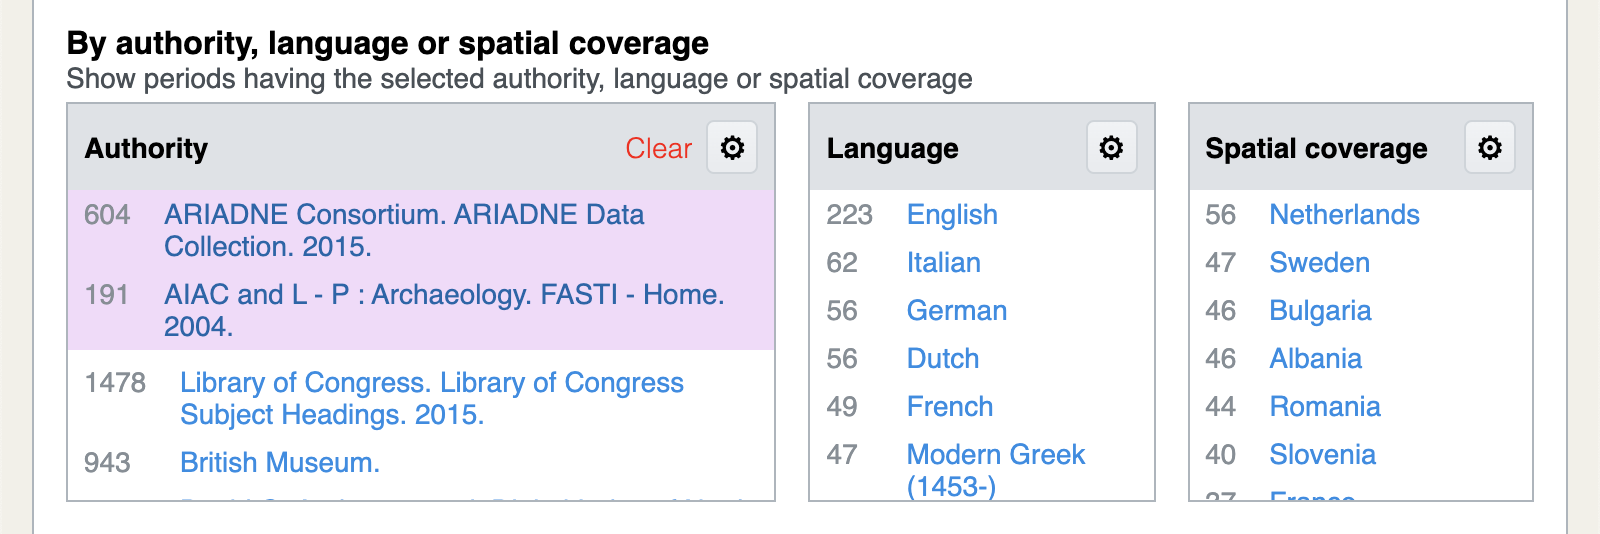
To select periods defined by specific authorities, locate and select them in the Authority facet list. In addition to ordering the authorities by count or by label, you can also order them by publication year. Click the ⚙ button at the top of the list and select Order by publication year.
If you just want to look at the periods from a single authority, it is easier to browse authorities.
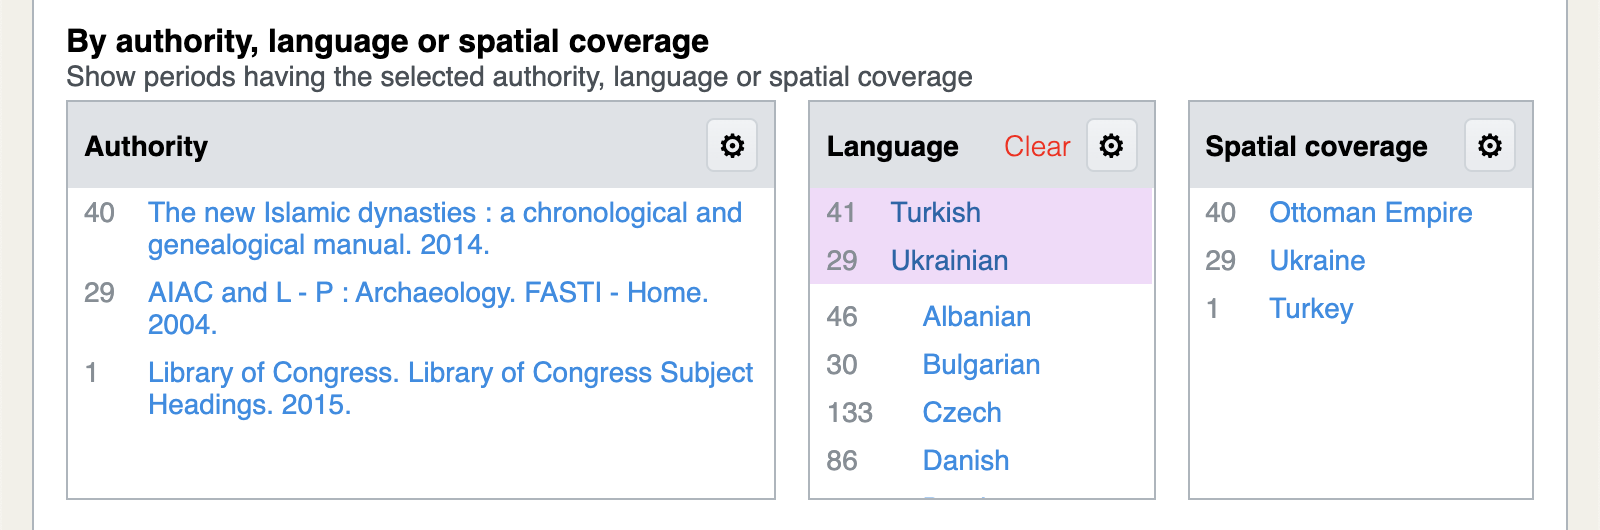
Selecting periods by language works just like the other facet lists: click on one or more languages in the Language facet list to show only periods with preferred labels in those languages.
Multiple filters can be set simultaneously, and only periods that match all of the filters will be selected. For example on may select periods that 1) have bronz in their labels, 2) are linked with the Wikidata records for Spain or France, and 3) are defined by the ARIADNE authority. The results will include only periods that satisfy all three of these criteria.

The current selection filters are reflected in the URL. This means that after using the filters to select a set of periods, the URL in the browser’s address bar can be copied and pasted to share the selected set of periods with someone else. (Note that this will only work if you are browsing the canonical PeriodO dataset or another web source.)
To reset all the selection filters to their default values, click the PeriodO logo at the top of the page.
To collapse and hide the selection filter controls, click the Filter periods header.
Browse selected periods
The currently selected set of periods is displayed both as regions on a map and as as spans on a timeline.
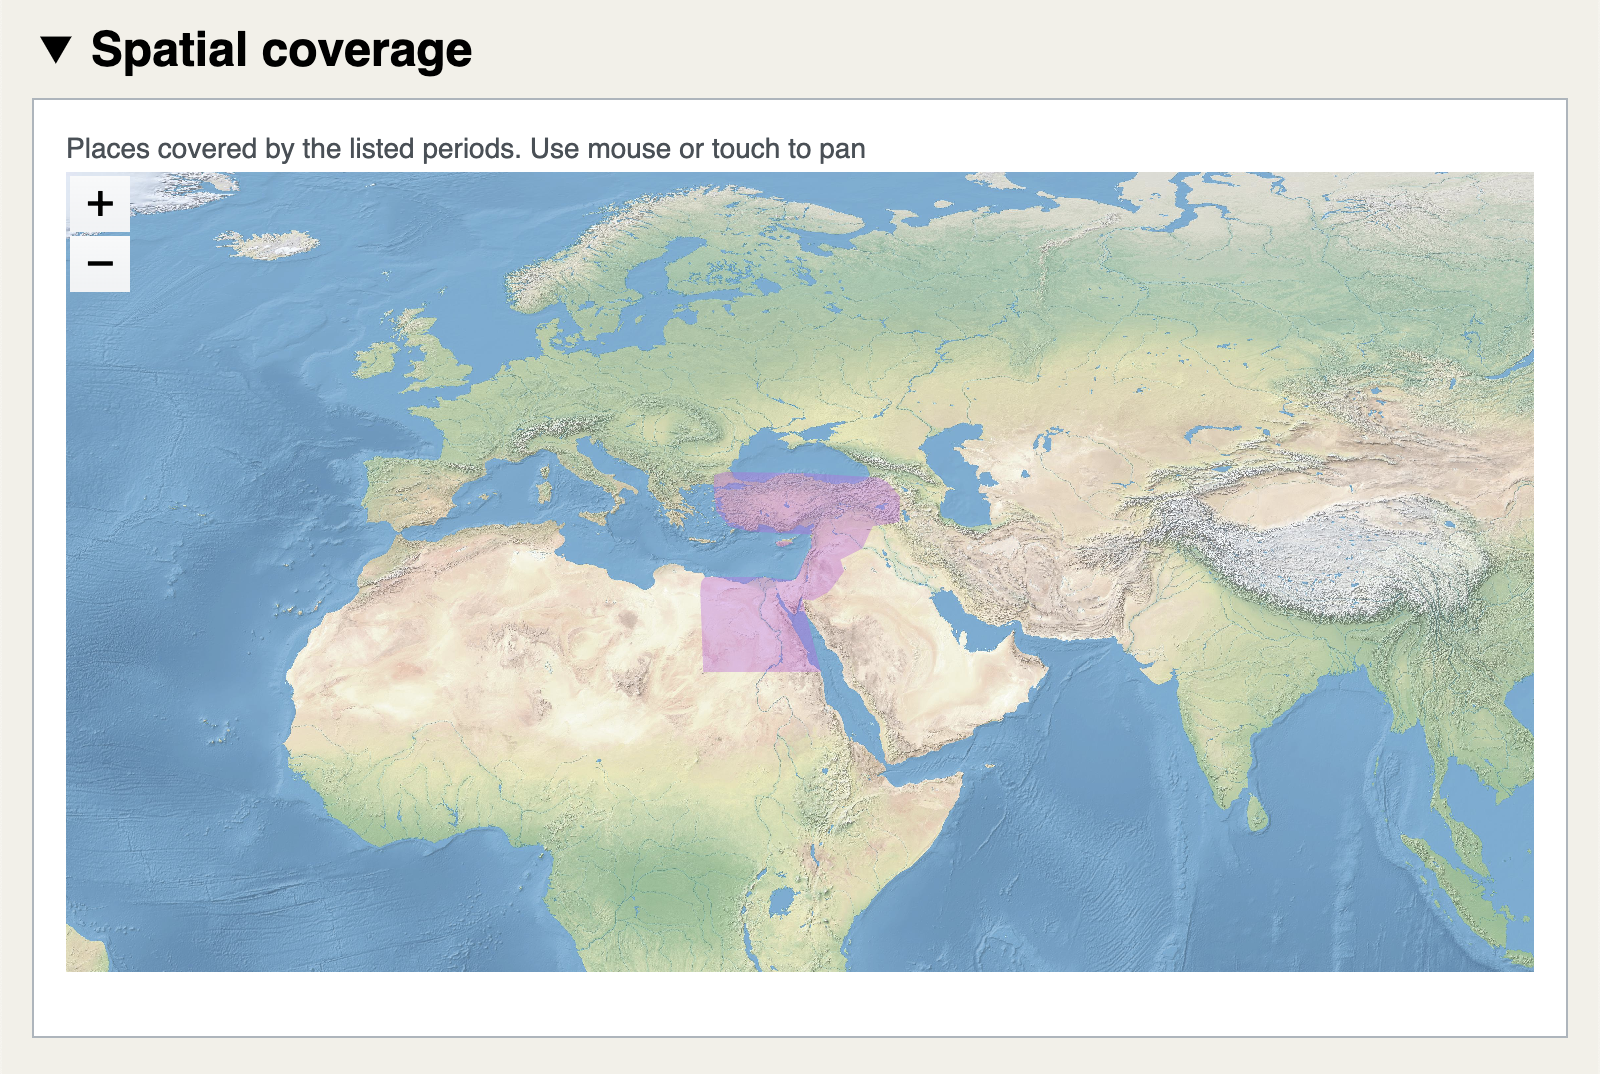
Use the map to get a sense of the combined spatial coverage of the selected periods, as specified by the Wikidata places they are linked to. The regions highlighted in purple indicate the spatial extents of all the Wikidata places linked to by the selected set of periods.
The map display should be interpreted cautiously, as not all periods are linked to Wikidata places, and not all Wikidata places are currently mappable (meaning we do not yet have an authoritative source for the geometry of their spatial extents.) Learn more about the PeriodO place name gazetteers.
The map can be zoomed using the + and - buttons or keys and panned by dragging. Hide the map by clicking the Spatial coverage header.
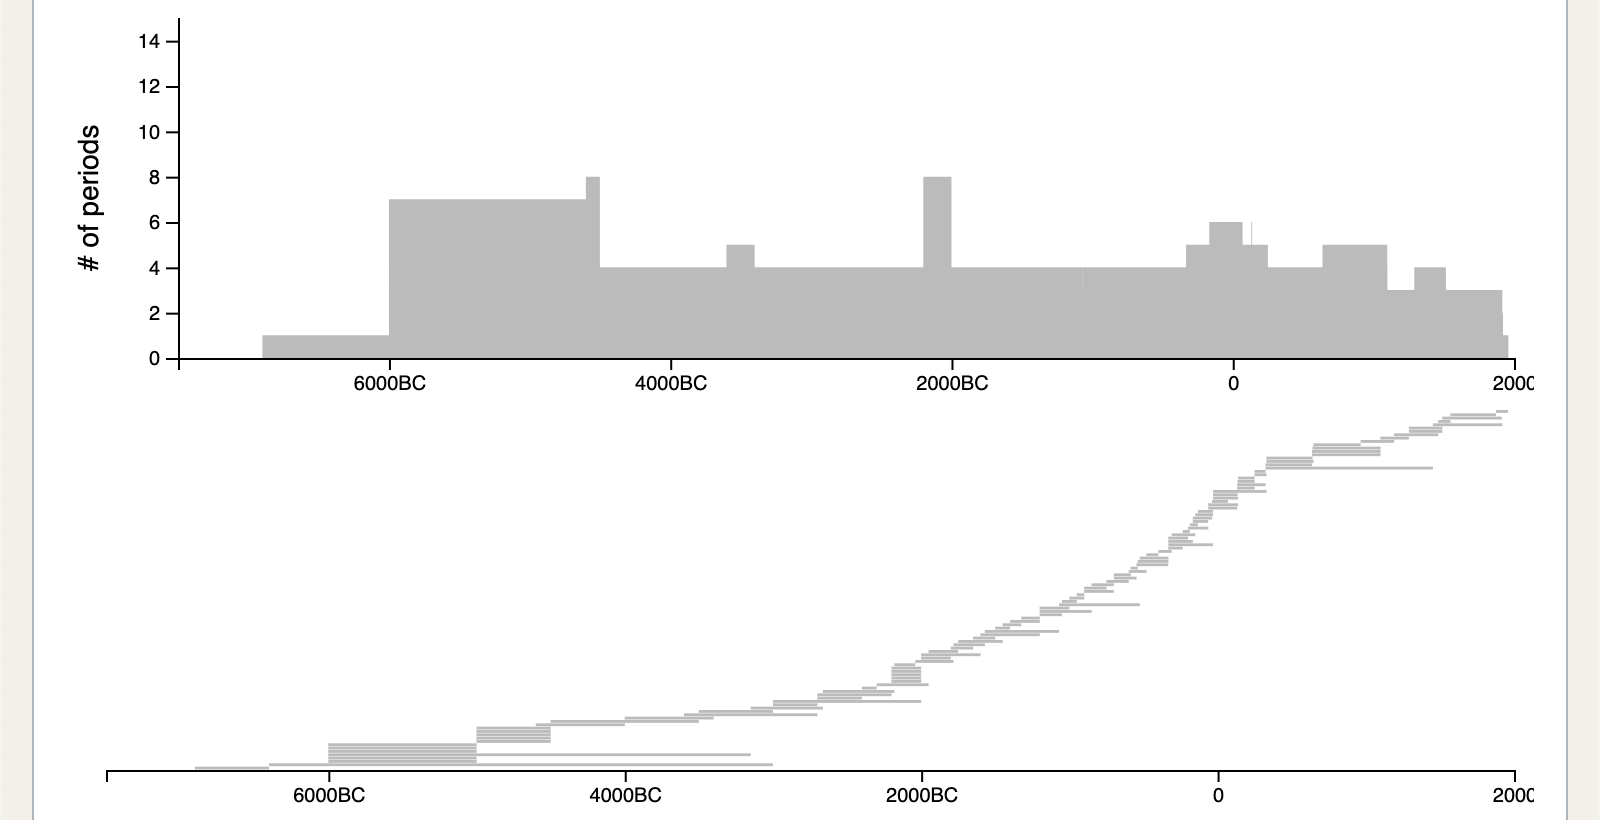
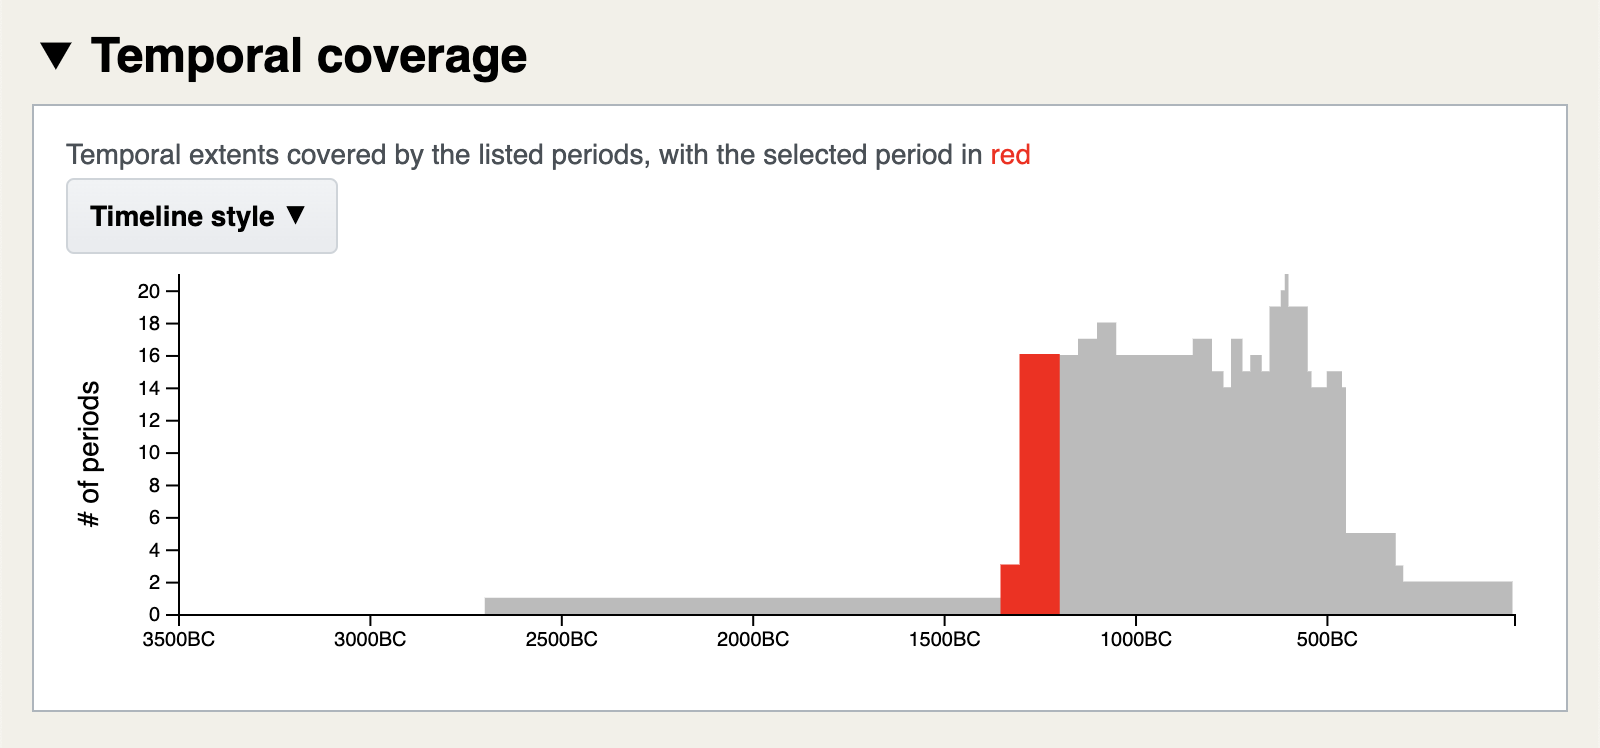
Use the timeline to compare the temporal extents of the selected periods. There are two styles of timeline. The histogram style shows, for each unit of time, how many of the selected periods include that unit. The stacked bars style shows the temporal extent of each period as a horizontal bar.
Hide the timeline by clicking the Temporal coverage header.
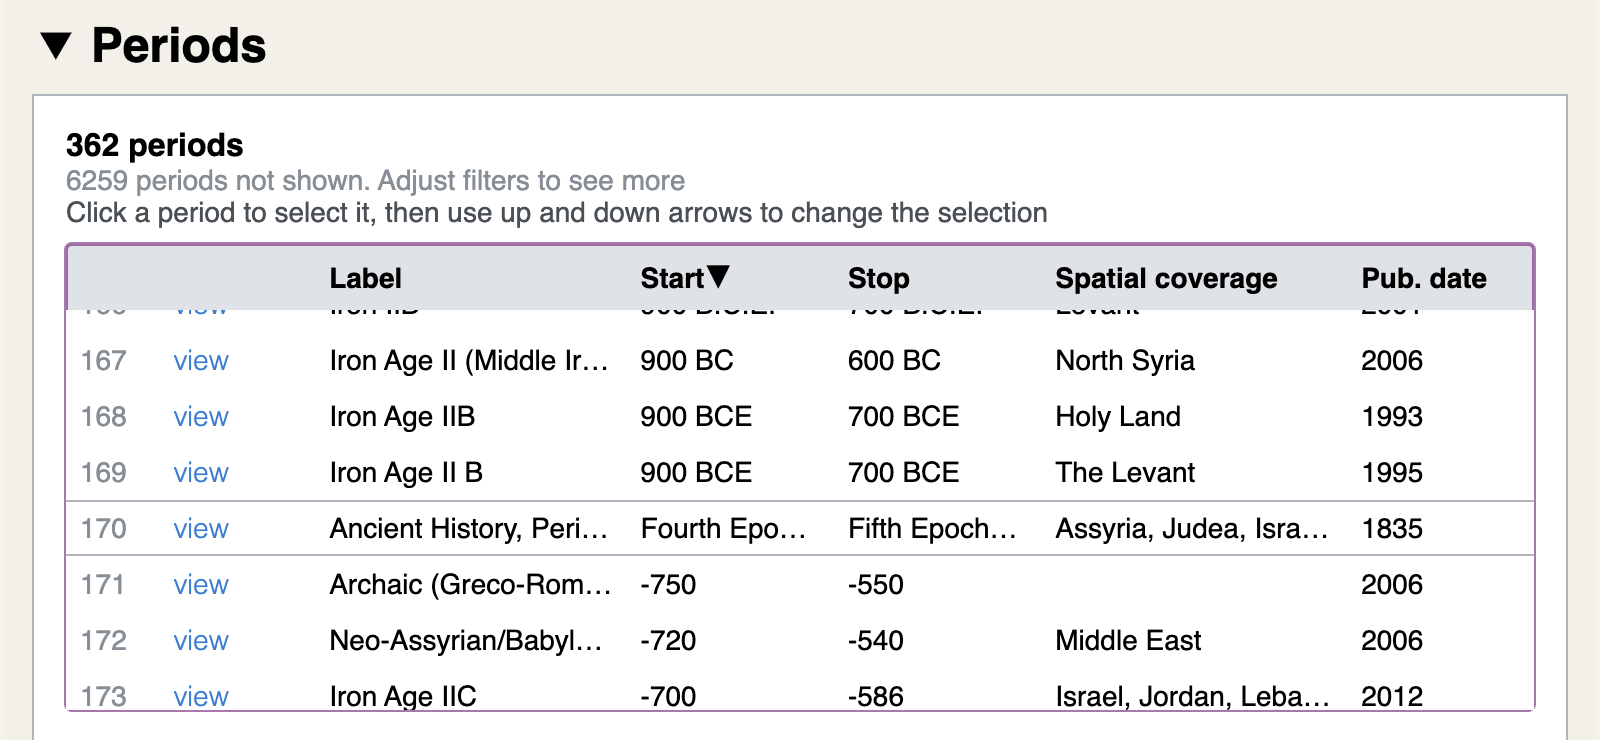
Below the timeline you will see a scrollable list of the currently selected Periods. The list can be sorted by clicking on the column headers.
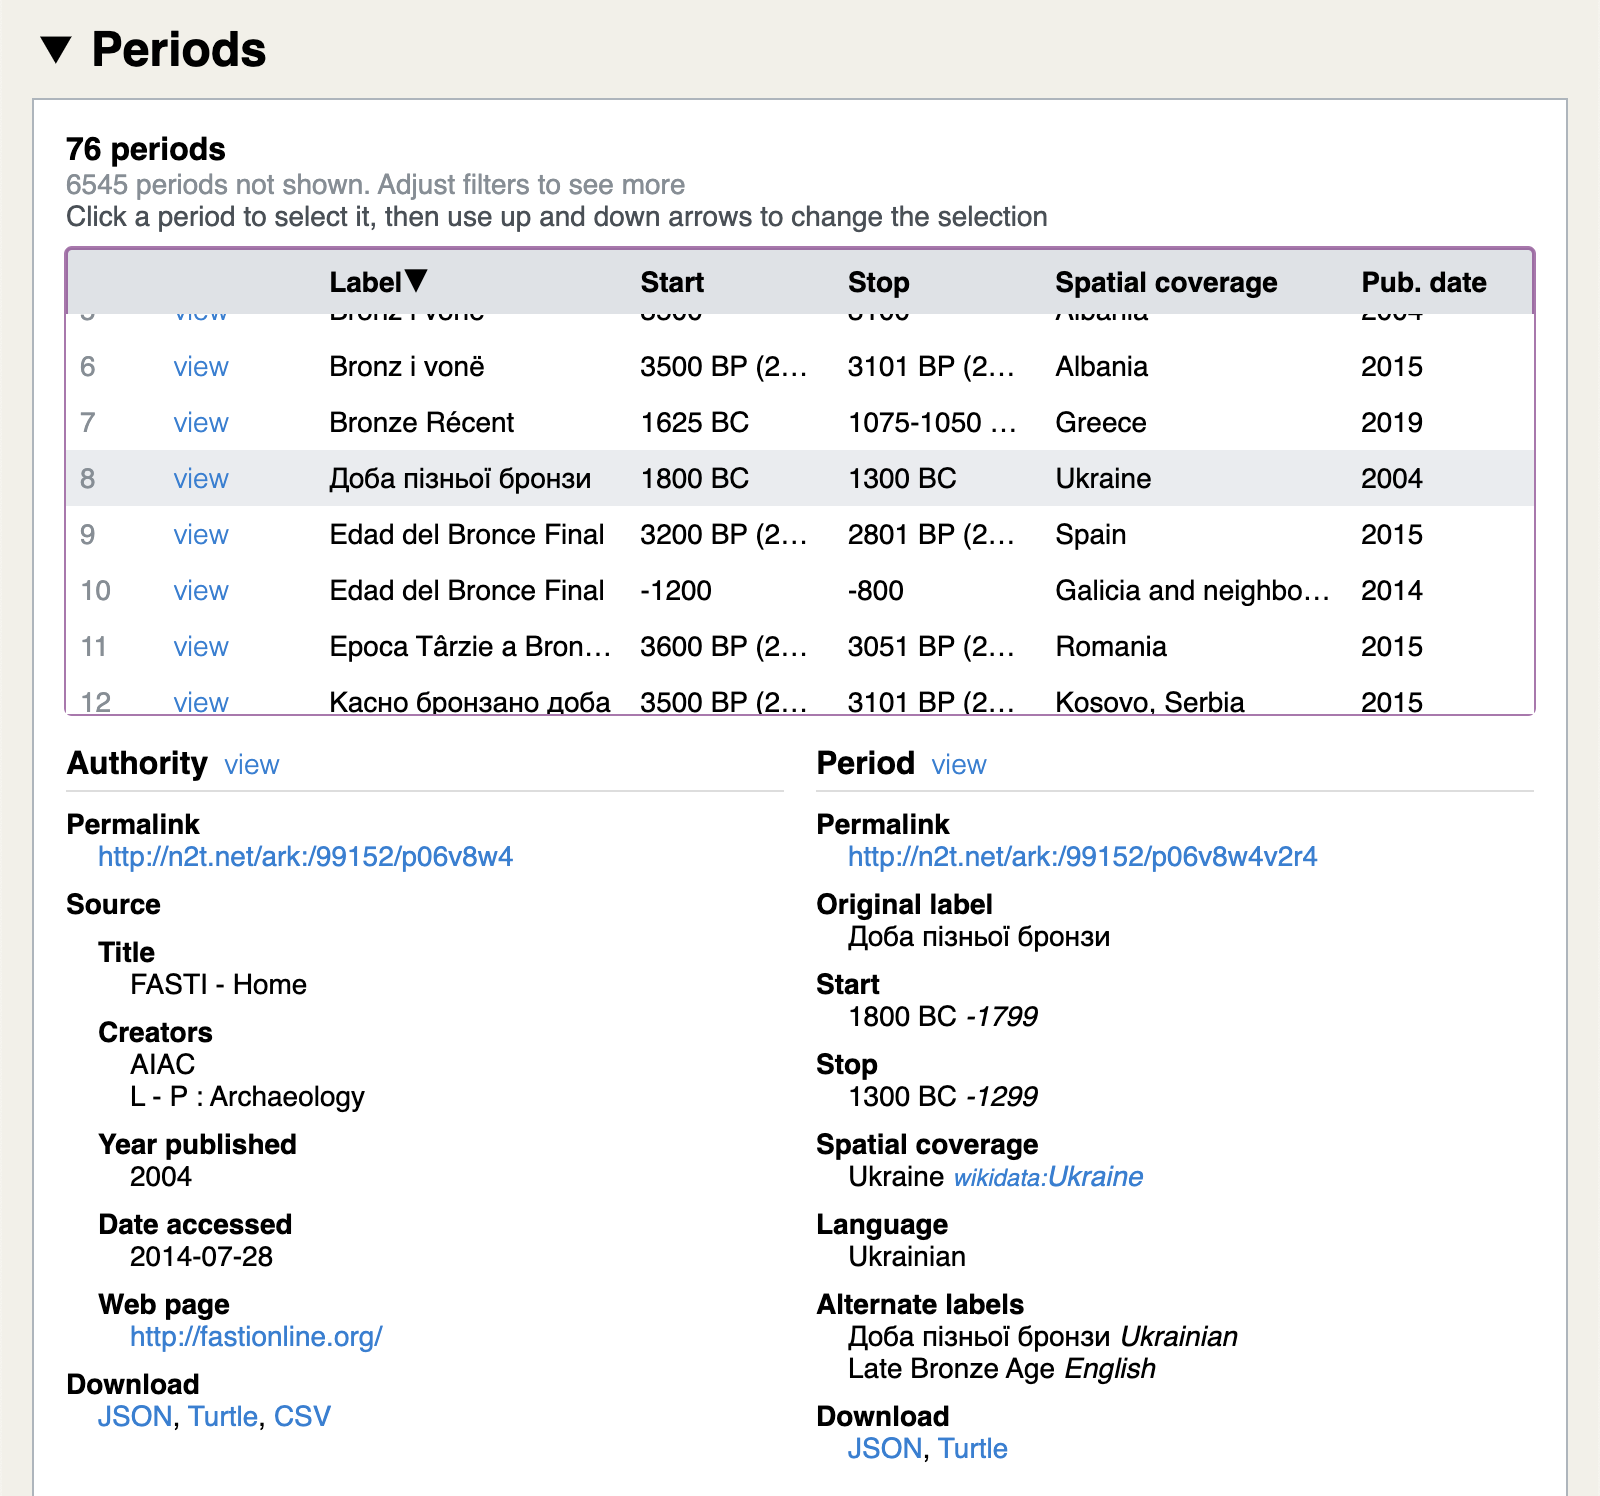
Hovering over a period in the list will display (below the list) detailed information about that period and the authority that defined it. Clicking on a period to select it will keep the detailed view focused on it. You can then use the up and down arrow keys to change the selected period.
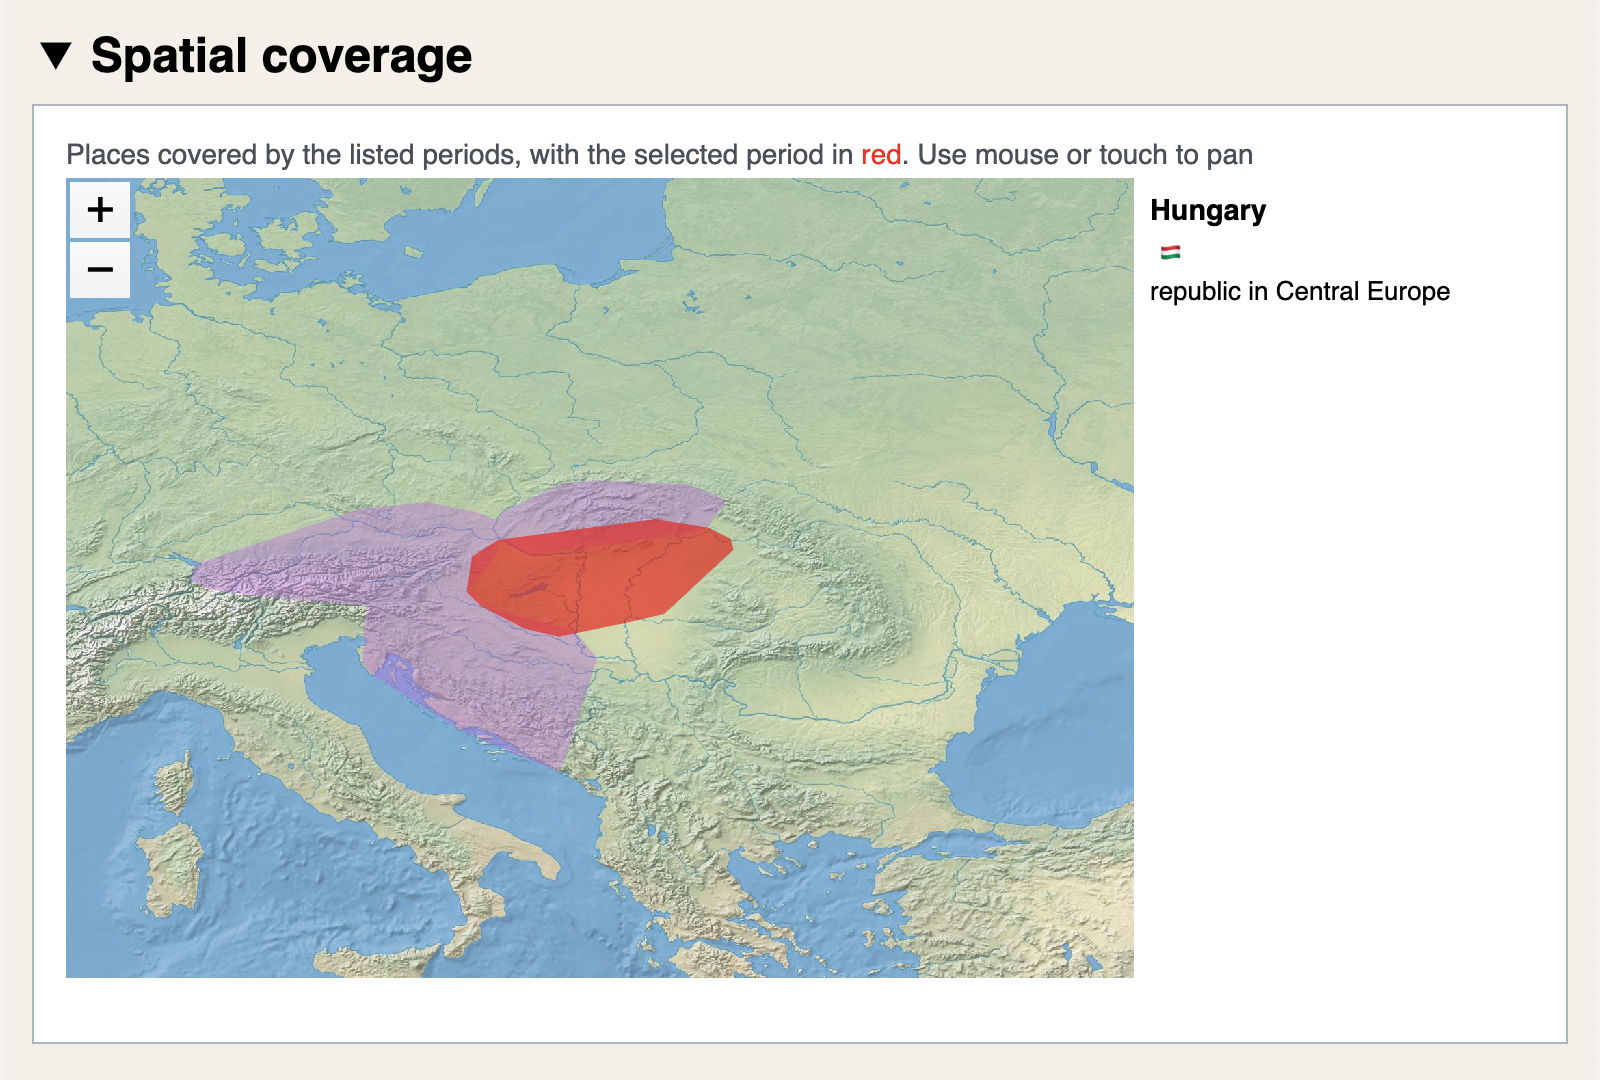
When you have a period selected in the period list, it will be highlighted in red in both the map and the timeline view.
Following the view link for a period in the Periods list will take you to the Period > View page for that period.
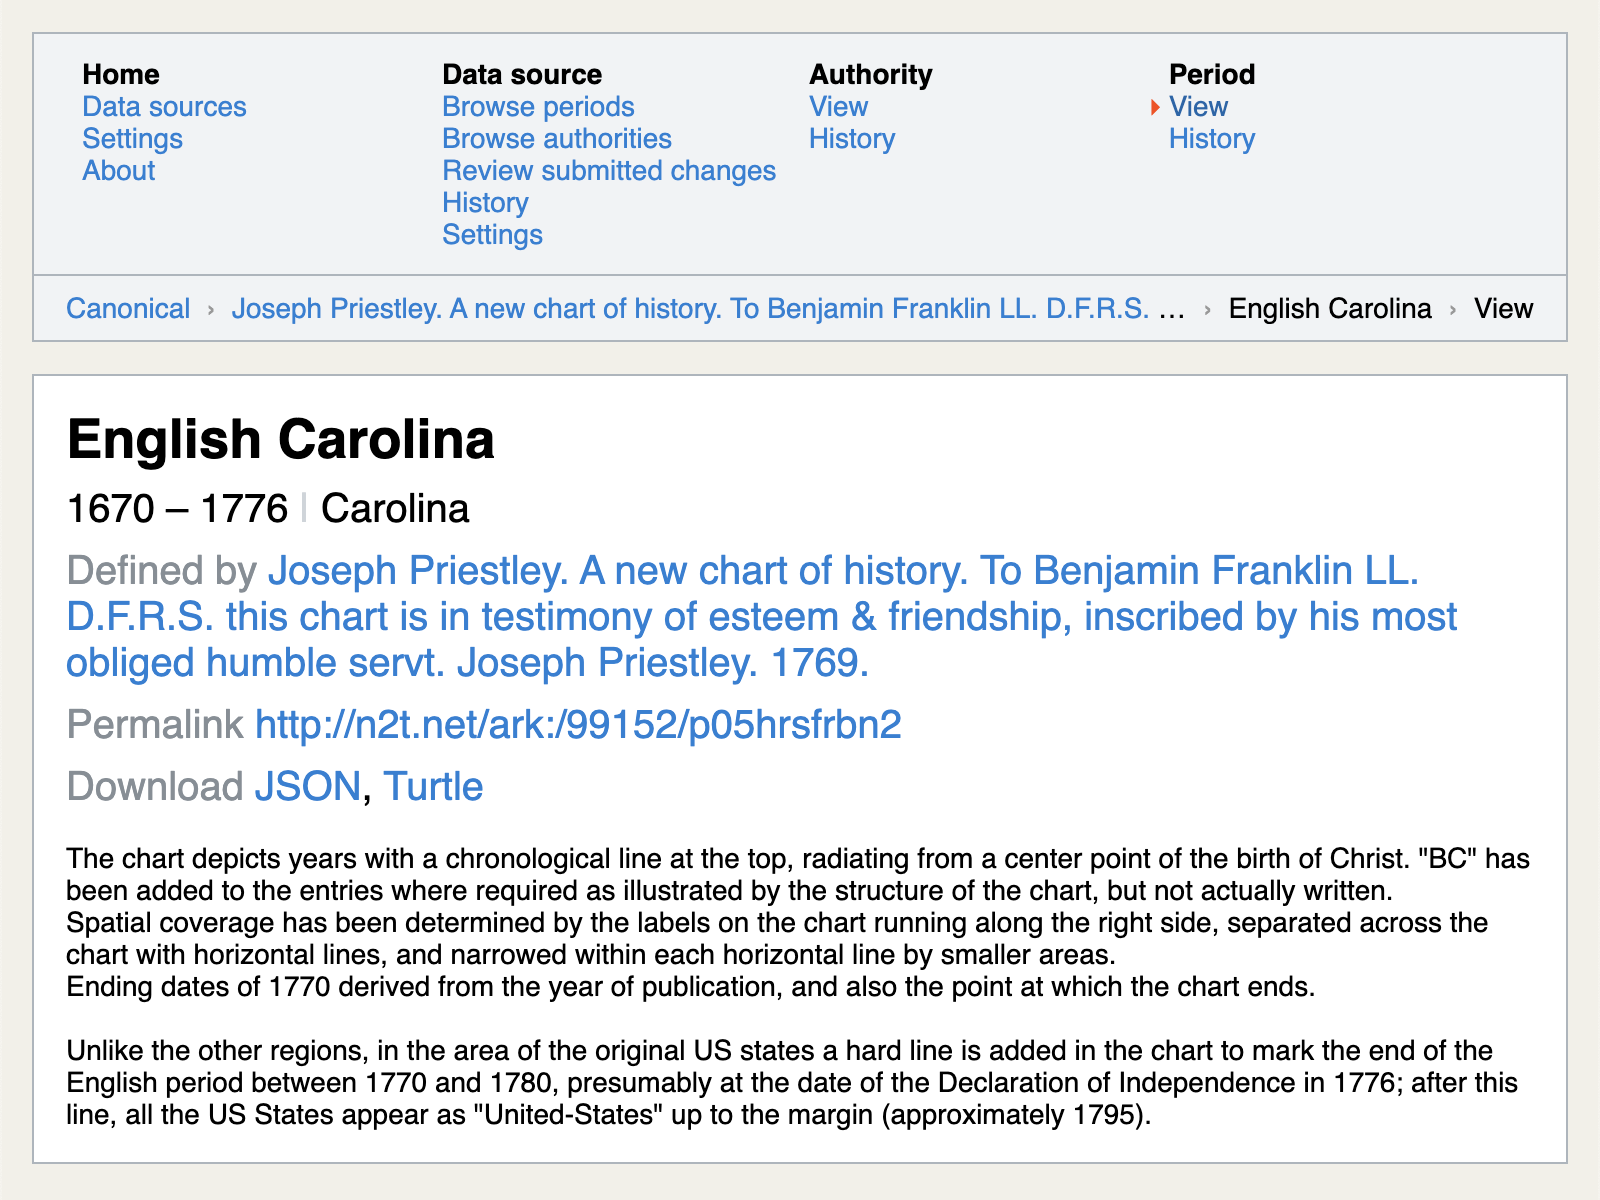
Viewing a period shows some key points about it: preferred label, temporal extent, and spatial coverage, all as given by the source authority, to which a Defined by link is provided. Any notes from the original author or the editors who added the period are shown here too.
Every period in the canonical dataset has been assigned a stable, permanent URL, also known as a Permalink. Right-click on this link to copy it. You should always use the permalink when referring to a period or sharing it with others—URLs displayed in the browser address bar may change over time, but permalinks are (relatively) guaranteed to be resolvable for the long term.
Following a PeriodO period permalink in a web browser should lead to the Period > View page for that period.
To Download the period as structured data (JSON or Turtle), click on the appropriate link.
When viewing a period, click the name of the authority that defined the period (after Defined by) or click on Authority > View in the navigation menu to navigate to the authority.
Browse source authorities
To find and view specific authorities, use the Browse authorities page. The list of authorities can be sorted by clicking on the column headers. Narrow the list by using the search box to show only matching authorities.
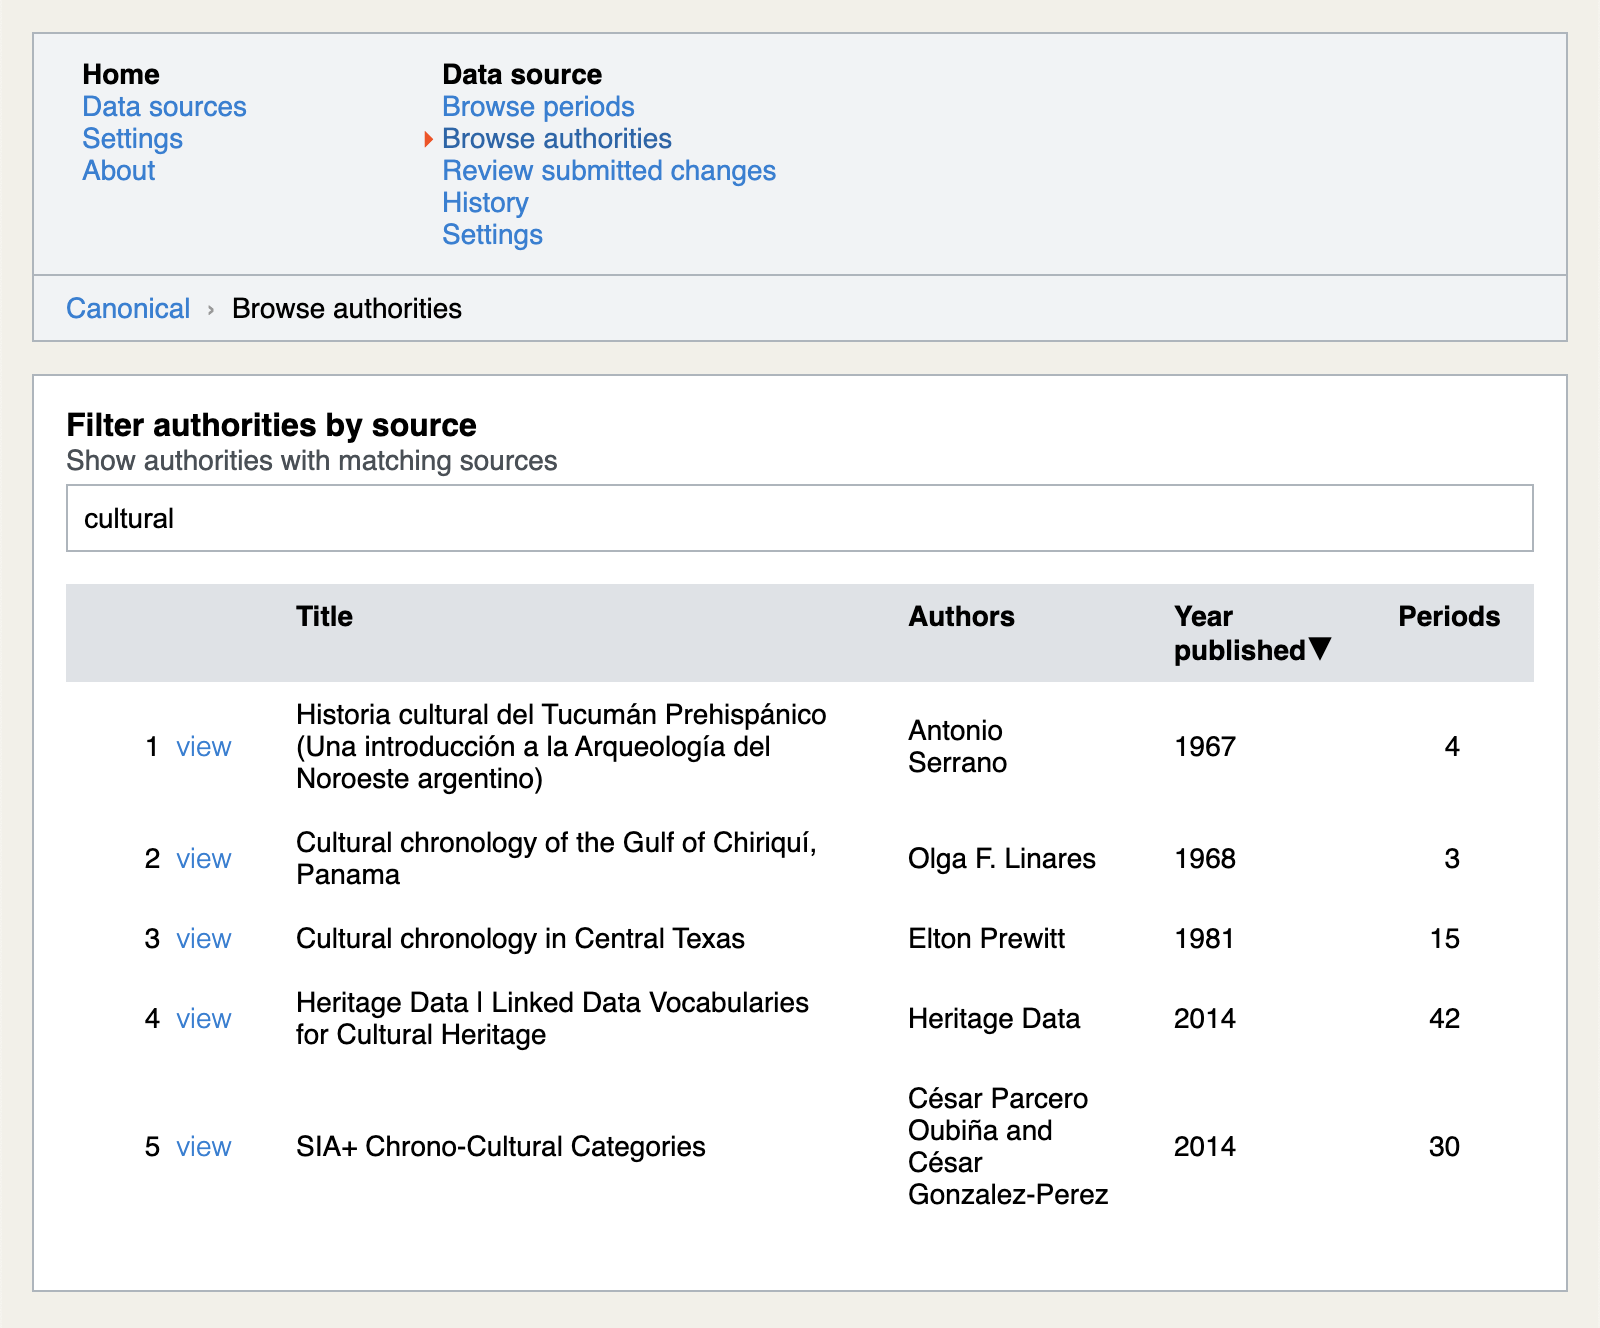
cultural in their names, ordered by publication year
Following the view link for an authority in the list will take you to the Authority > View page for that period.
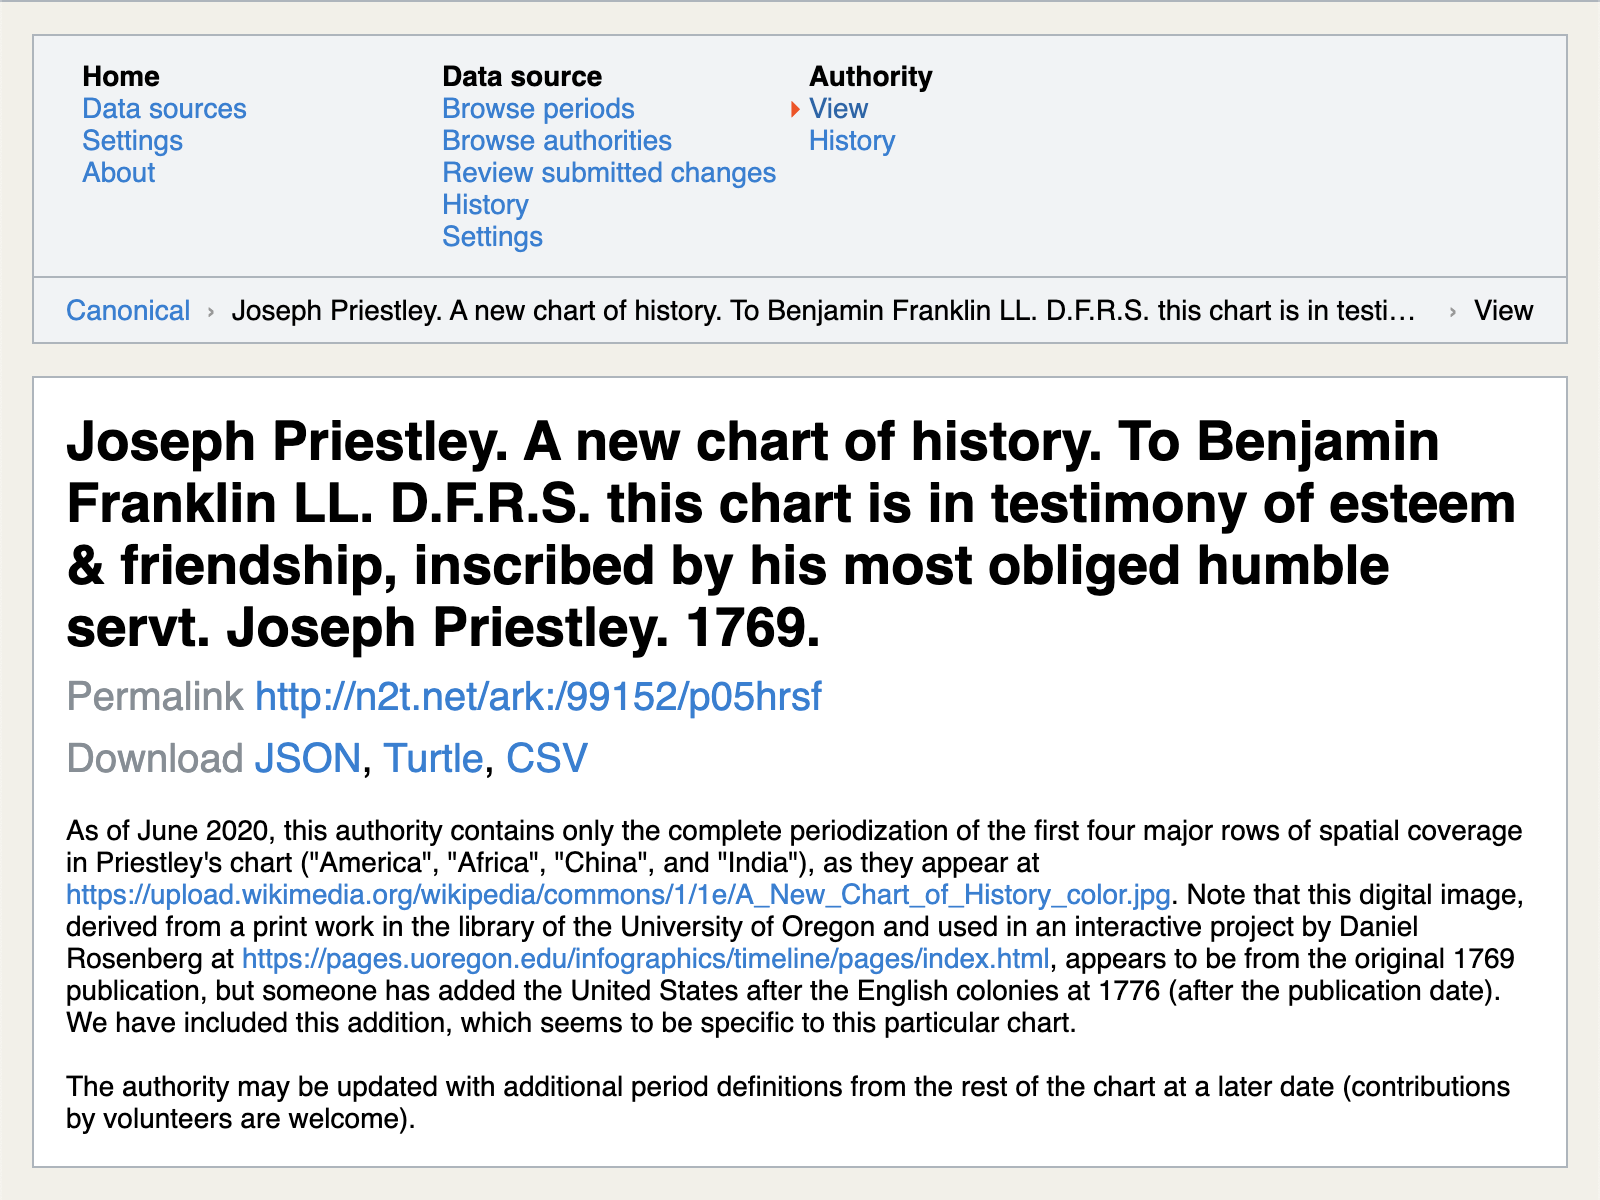
Navigating to an individual authority will show its name, creators, and other citable information. Any notes from the original author or the editors who added the authority are shown here too, if they are relevant to the authority as a whole.
As with periods, every authority in the canonical dataset also has been assigned a Permalink. Again, you should always use the permalink when referring to an authority or sharing it with others.
To Download the authority as structured data (JSON or Turtle), click on the appropriate link.
The rest of the Authority > View page works just like browsing periods, except that now all the periods belong to a single authority.
Get periods as structured data
The canonical PeriodO dataset can be downloaded as a JSON-LD file:
http://n2t.net/ark:/99152/p0d.json
As a Turtle file:
http://n2t.net/ark:/99152/p0d.ttl
Or as a CSV file:
http://n2t.net/ark:/99152/p0d.csv
You can also download individual authorities and periods as structured data: navigate to any individual period or authority and use the Download links.
Depending on how they are followed, PeriodO permalinks will lead either to a structured data representation of the linked period or authority, or to a view of that data loaded in the PeriodO client.
For example:
Following the permalink for
Energy epoch four: flesh(http://n2t.net/ark:/99152/p0323gxv8wc) in a browser will open the Period > View page in the client showing the the details of that period.Specifying an
accept: application/jsonHTTP header and requesting the same permalink will return a JSON-LD representation of the period:curl -s -L -H 'accept: application/json' \ http://n2t.net/ark:/99152/p0323gxv8wc \ | riot --syntax=jsonld --count stdin : Triples = 22Specifying an
accept: text/turtleHTTP header and requesting the same permalink will return a Turtle representation of the period:curl -s -L -H 'accept: text/turtle' \ http://n2t.net/ark:/99152/p0323gxv8wc \ | riot --syntax=turtle --count stdin : Triples = 22To link directly to the JSON-LD representation of the period, append
.jsonto the end of the permalink:http://n2t.net/ark:/99152/p0323gxv8wc.jsonTo link directly to the Turtle representation of the period, append
.ttlto the end of the permalink:http://n2t.net/ark:/99152/p0323gxv8wc.ttlTo see a syntax-highlighted view of the JSON-LD or Turtle representation of the period, append
.htmlto the end of the permalink:http://n2t.net/ark:/99152/p0323gxv8wc.ttl.html
Create or edit your own periods
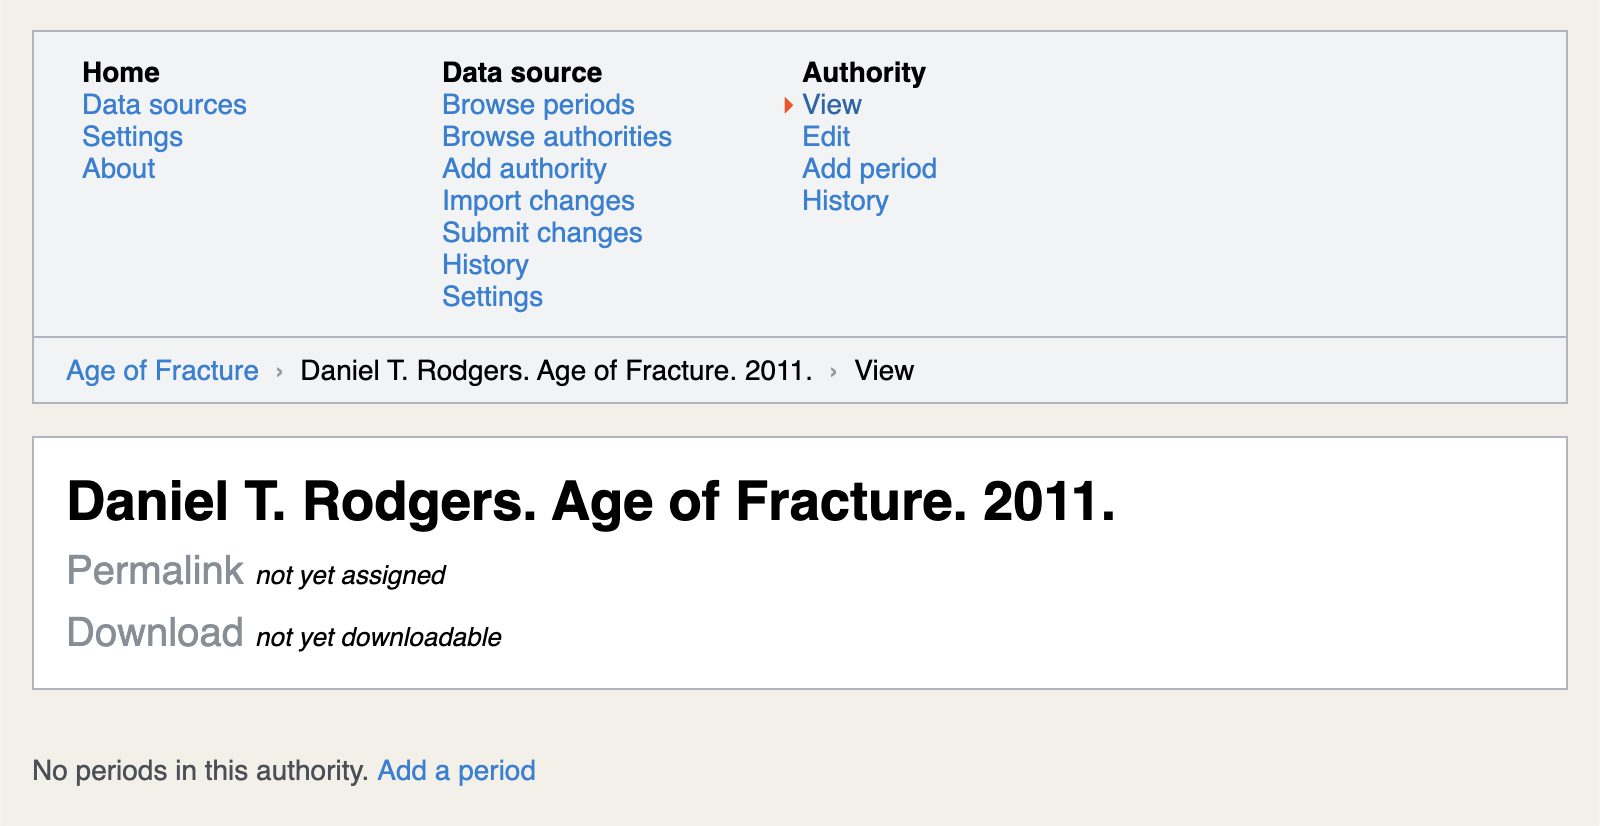
the period “Age of Fracture”—also the title of historian
Daniel Rodgers’ 2011 book, in which he defines it
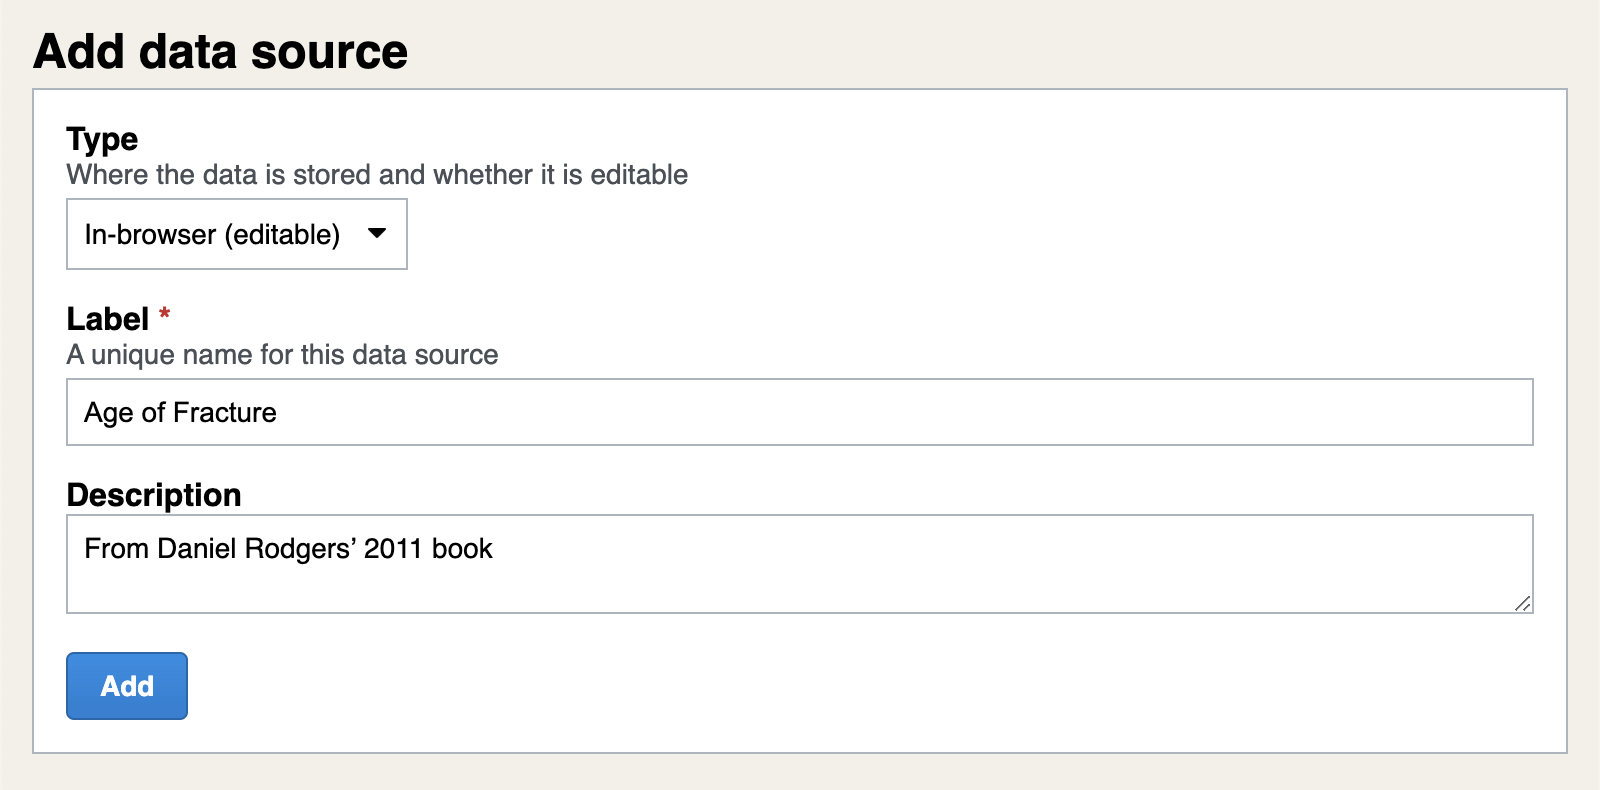
To edit or create new periods and authorities, you must create a local, in-browser database. To do this, first navigate to Home > Data sources. Under Add data source, set the Type to In-browser (editable), give your data source a label and (optionally) a description, and click Add.
You will see the Browse periods page, but there will be no periods to browse because initially your data source will be empty. Before you can add a new period, you first need to create an authority or source for the definition of the period. Every period belongs to an authority, even if it was informally published. Navigate to Data source > Add authority to create a new authority.
First you need to provide some a citable description of the authoritative source—information that could be used to find it online or in a library.
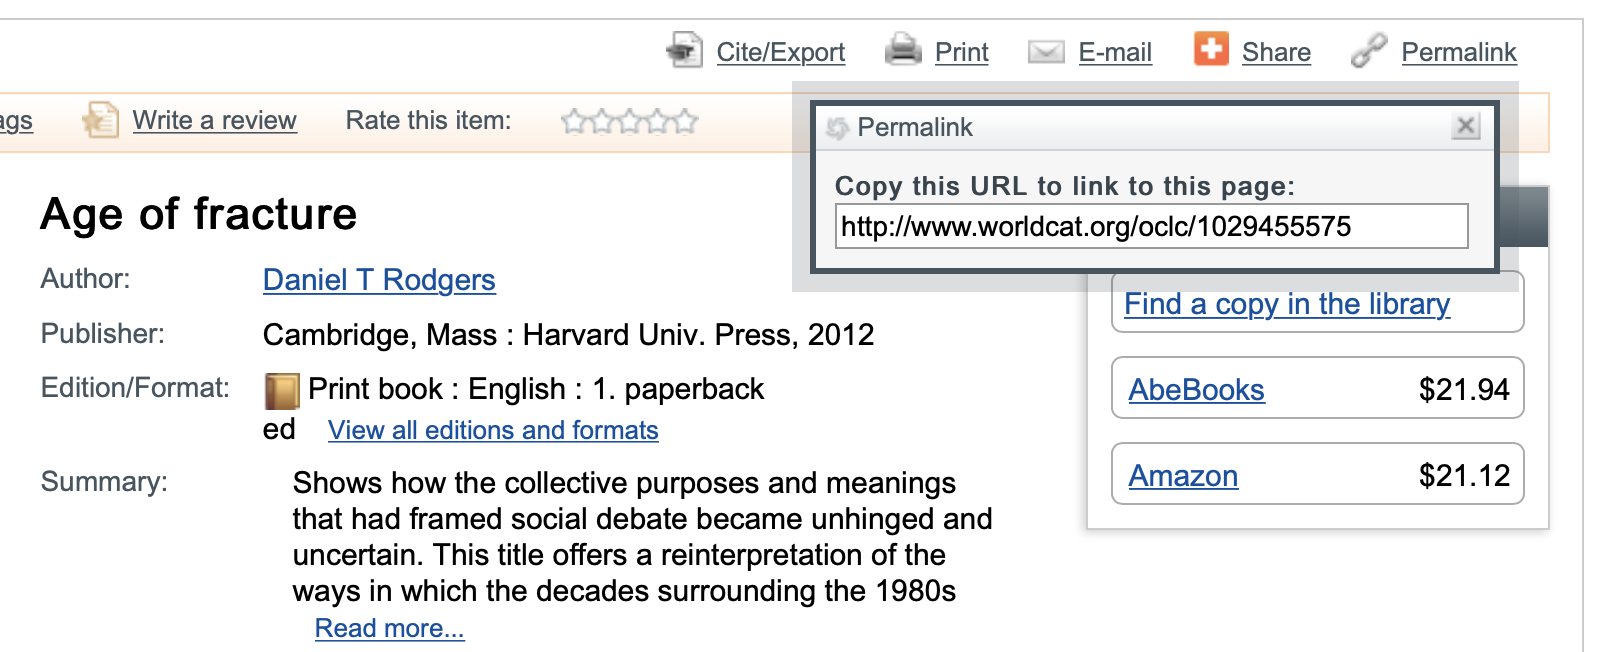
If the source is a book or some other kind of artifact held by a library anywhere in the world, you can easily provide this information by looking it up in the WorldCat catalog. Search for the item in WorldCat, and navigate to the item’s catalog page. Copy the Permalink in the upper right-hand corner.
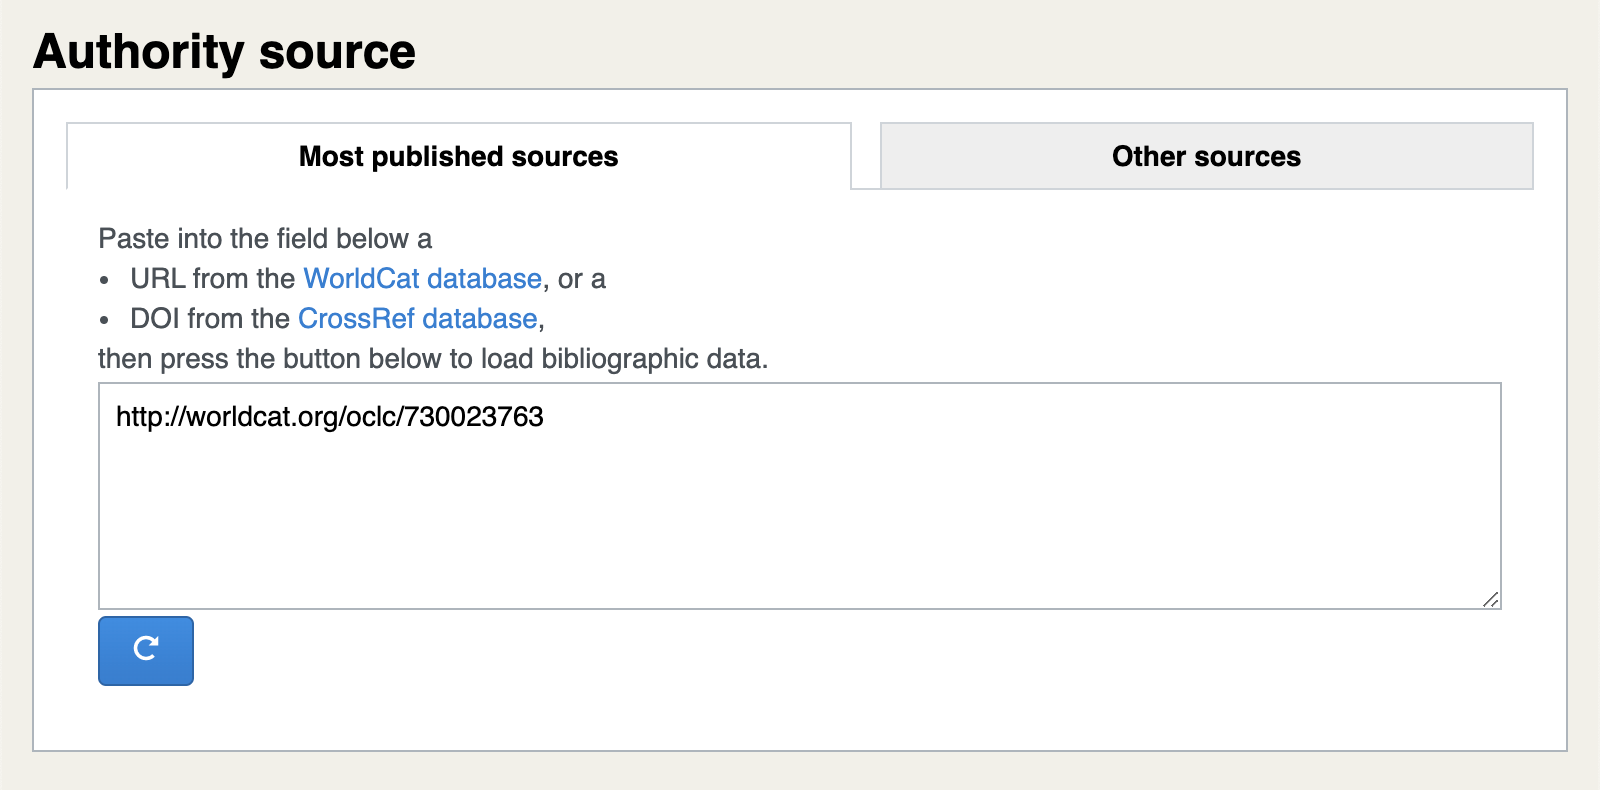
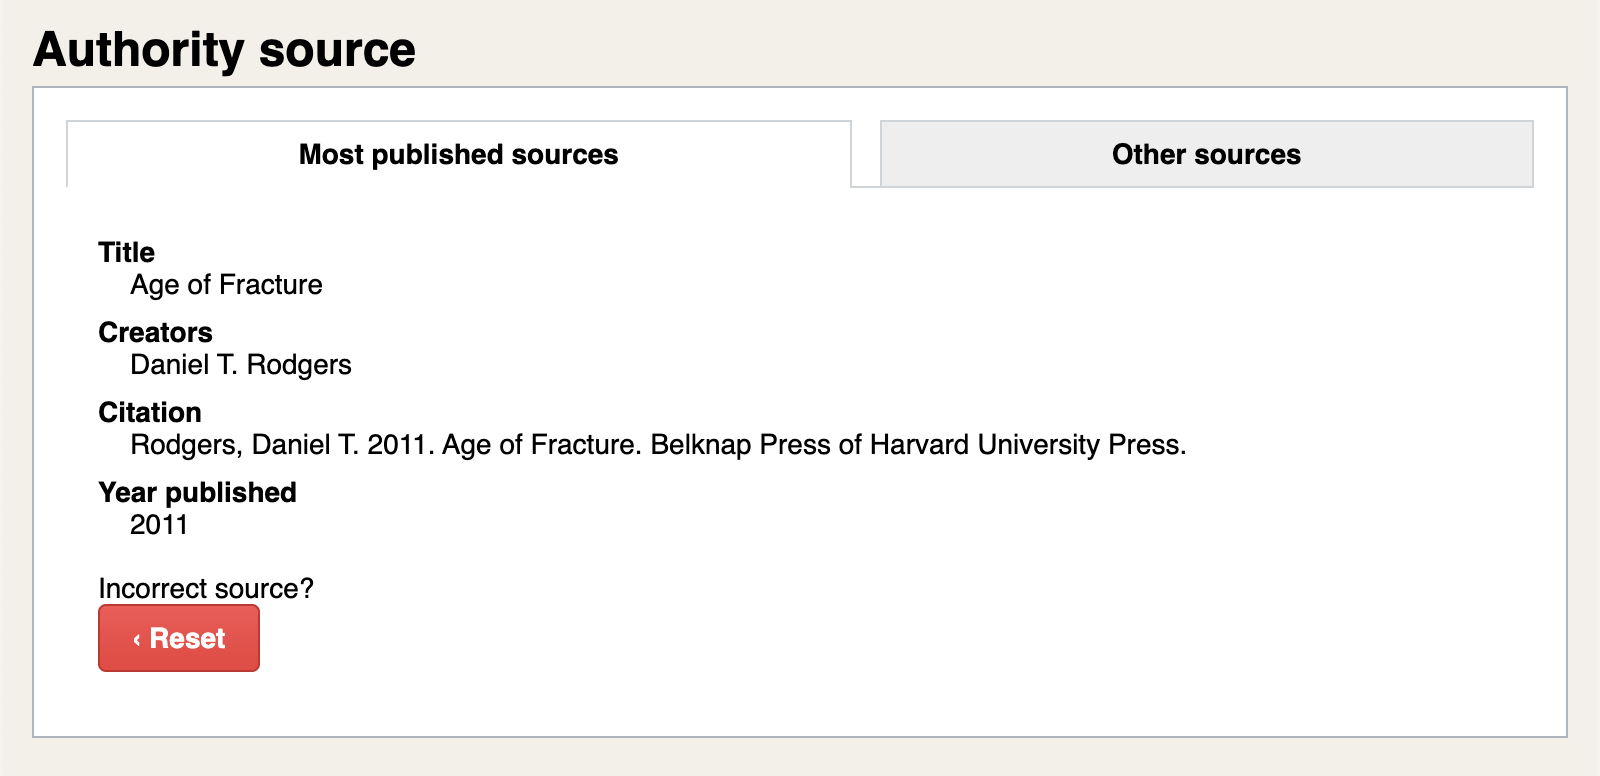
Paste the link you copied from WorldCat into the Most published sources tab in the PeriodO client interface. Then click the ⟳ button to load a citable description directly from WorldCat.
If the source is a scholarly article or other artifact that has been assigned a digital object identifier or DOI, you can also copy and paste the DOI into the Most published sources tab to load a citable description directly from the CrossRef database.
If the source is something less formally published, such as a web page, you’ll need to enter a citable description manually. Click the Other sources tab to do this. Try to enter as much descriptive information as possible.
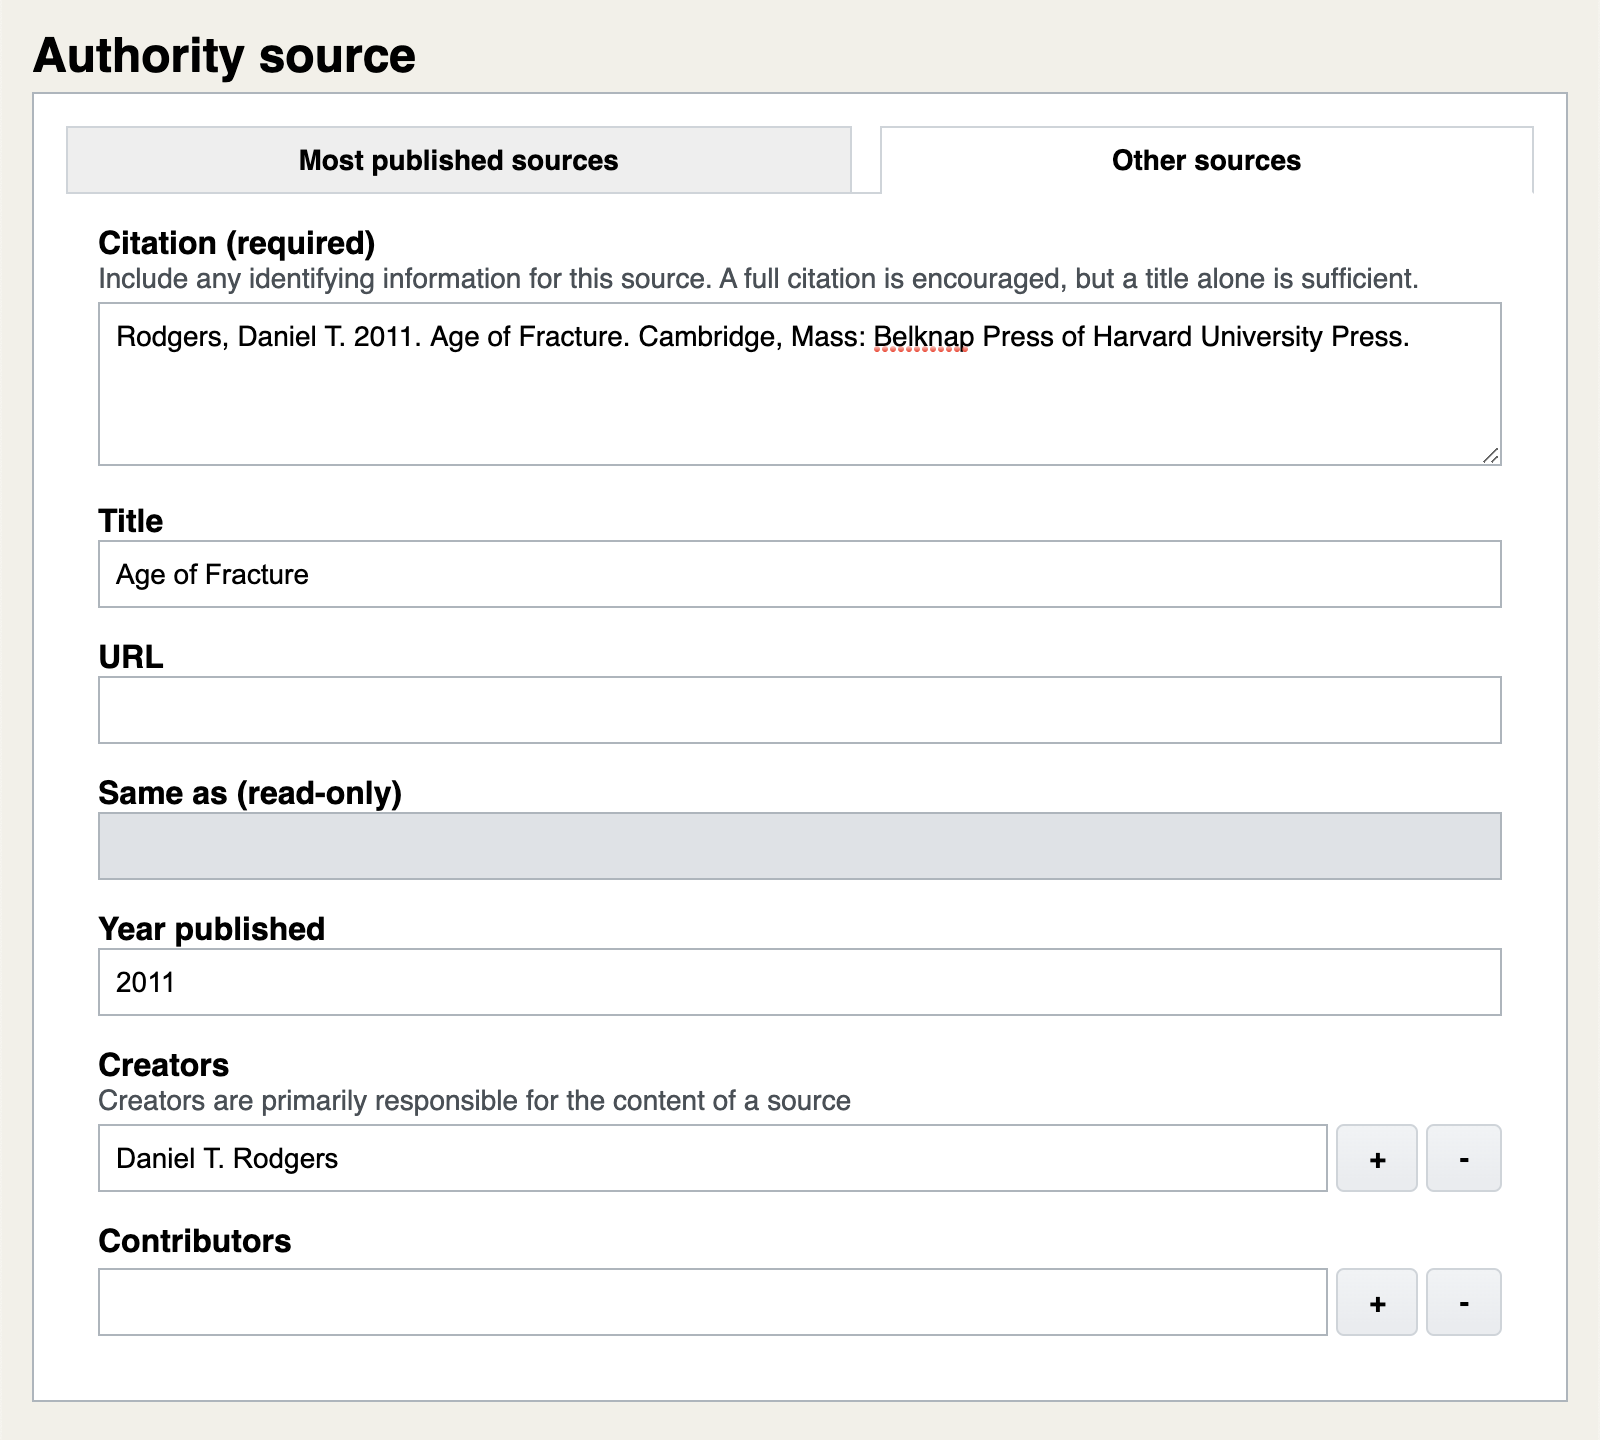
If the source is a page-numbered text, and all of the periods that it defines are on a single page (for example in a table), you can also put that page number in the Locator field (whether or not you manually entered the other citable information). If the periods defined by the authority are on different pages, don’t put that information here—put it with the description of each period.
If there is anything to else important to note about the authority that isn’t specific to one of the periods it defines, put it in the Editorial notes.
Press Save to create your new authority. You will be navigated to Authority > View and should see your new authority with no periods in it.
To add a period to the empty authority, navigate to Authority > Add period.
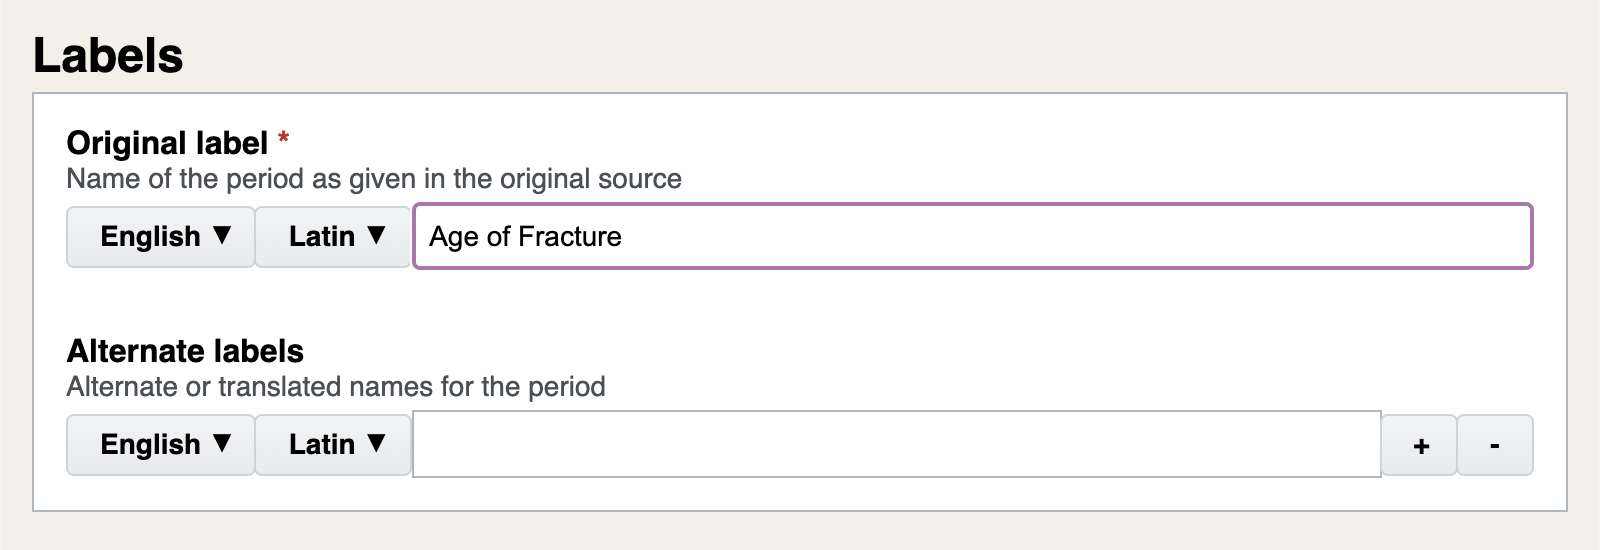
Under Original label, give the name of the period as it is given in the authoritative source. If the original label is in English, you needn’t provide any Alternate labels unless alternate names are given in the source.
If the original label is not in English, you should add at least one alternate label in English. You can specify the language for each label, and if the language is one with multiple written scripts, you should specify the script as well.
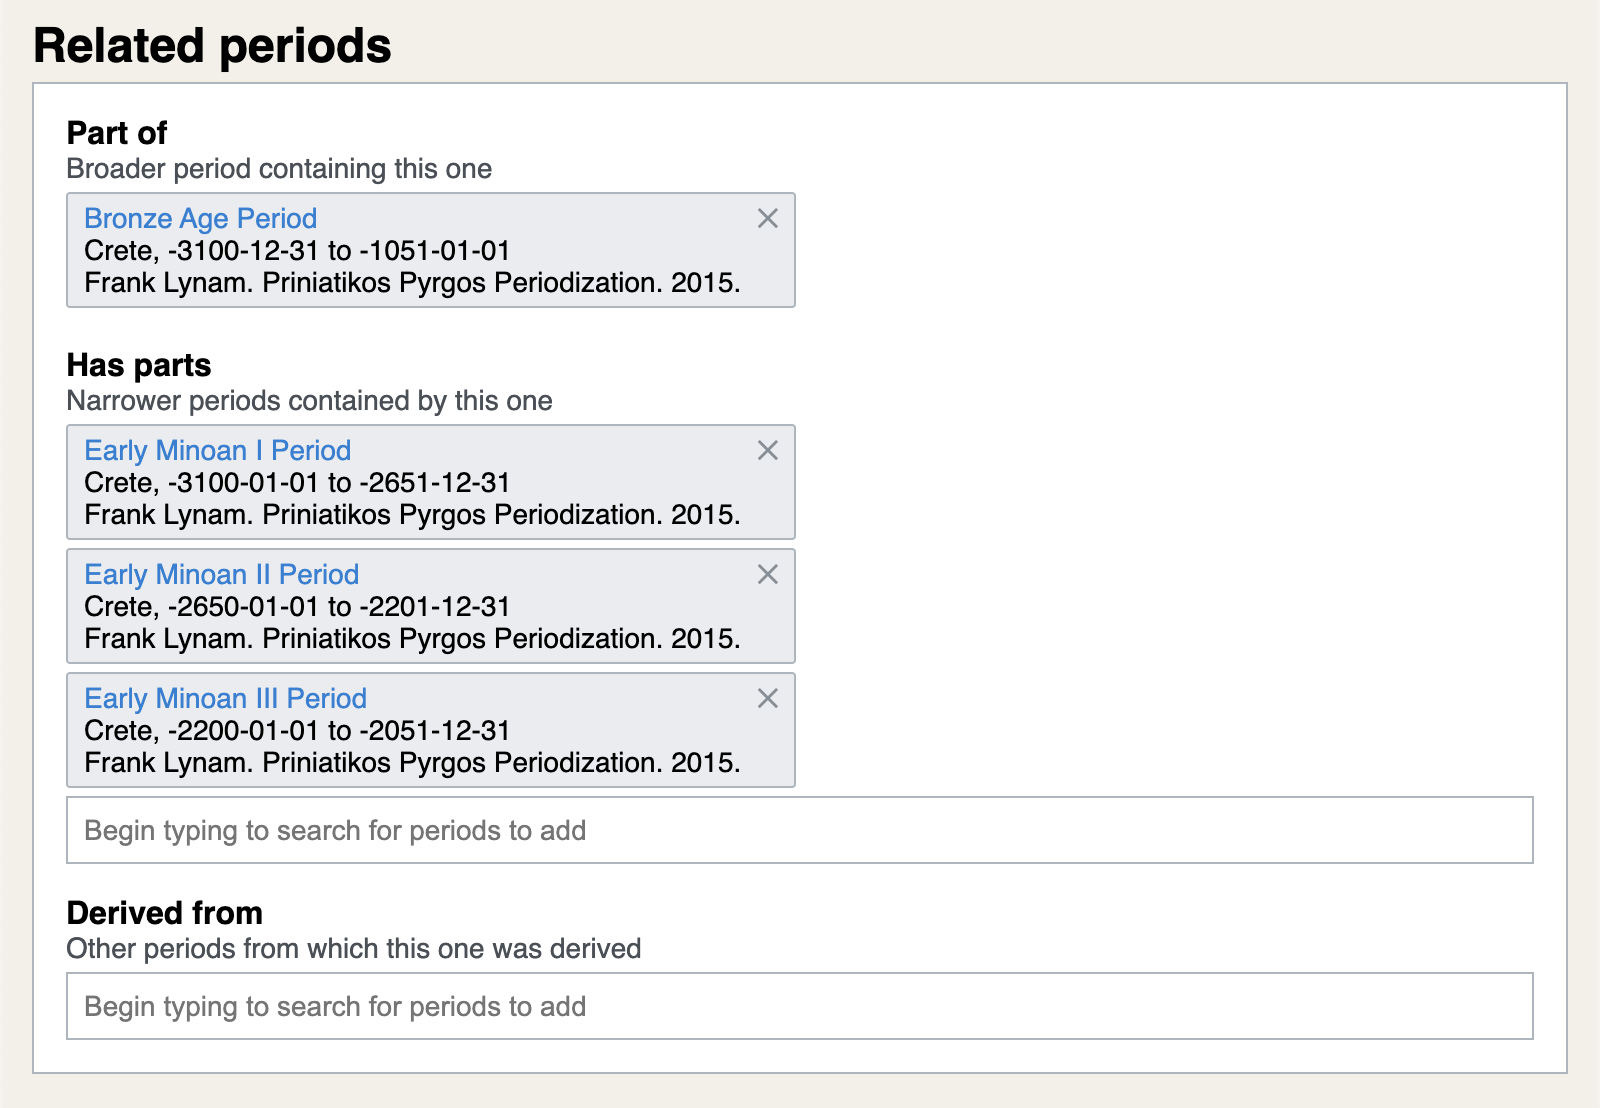
the Early Minoan Period is part of the Bronze Age Period and has parts I, II, and III
Periods are commonly arranged into hierarchies. You can create hierarchies when adding or editing a period either by referencing a broader period that the currenrt one is Part of, or by listing narrower periods that the current one contains (Has parts). (You need not do both; indicating a relationship pointing from broader to narrower will also establish a relationship from narrower to broader, and vice versa.) Note that hierarchies can only contain periods from the same authority, so it is only possible to add broader or narrower links once you have added at least one other period to an authority.
Periods are often defined as modifications of periods defined by others. PeriodO records these relationships as Derived from links. Unlike broader and narower relations, derivation relations can (and usually should) relate periods from different authorities. To add derivation relations to periods from a different authority, that authority needs to be included in your editable data source.
To remove any related period, click the X beside its name.
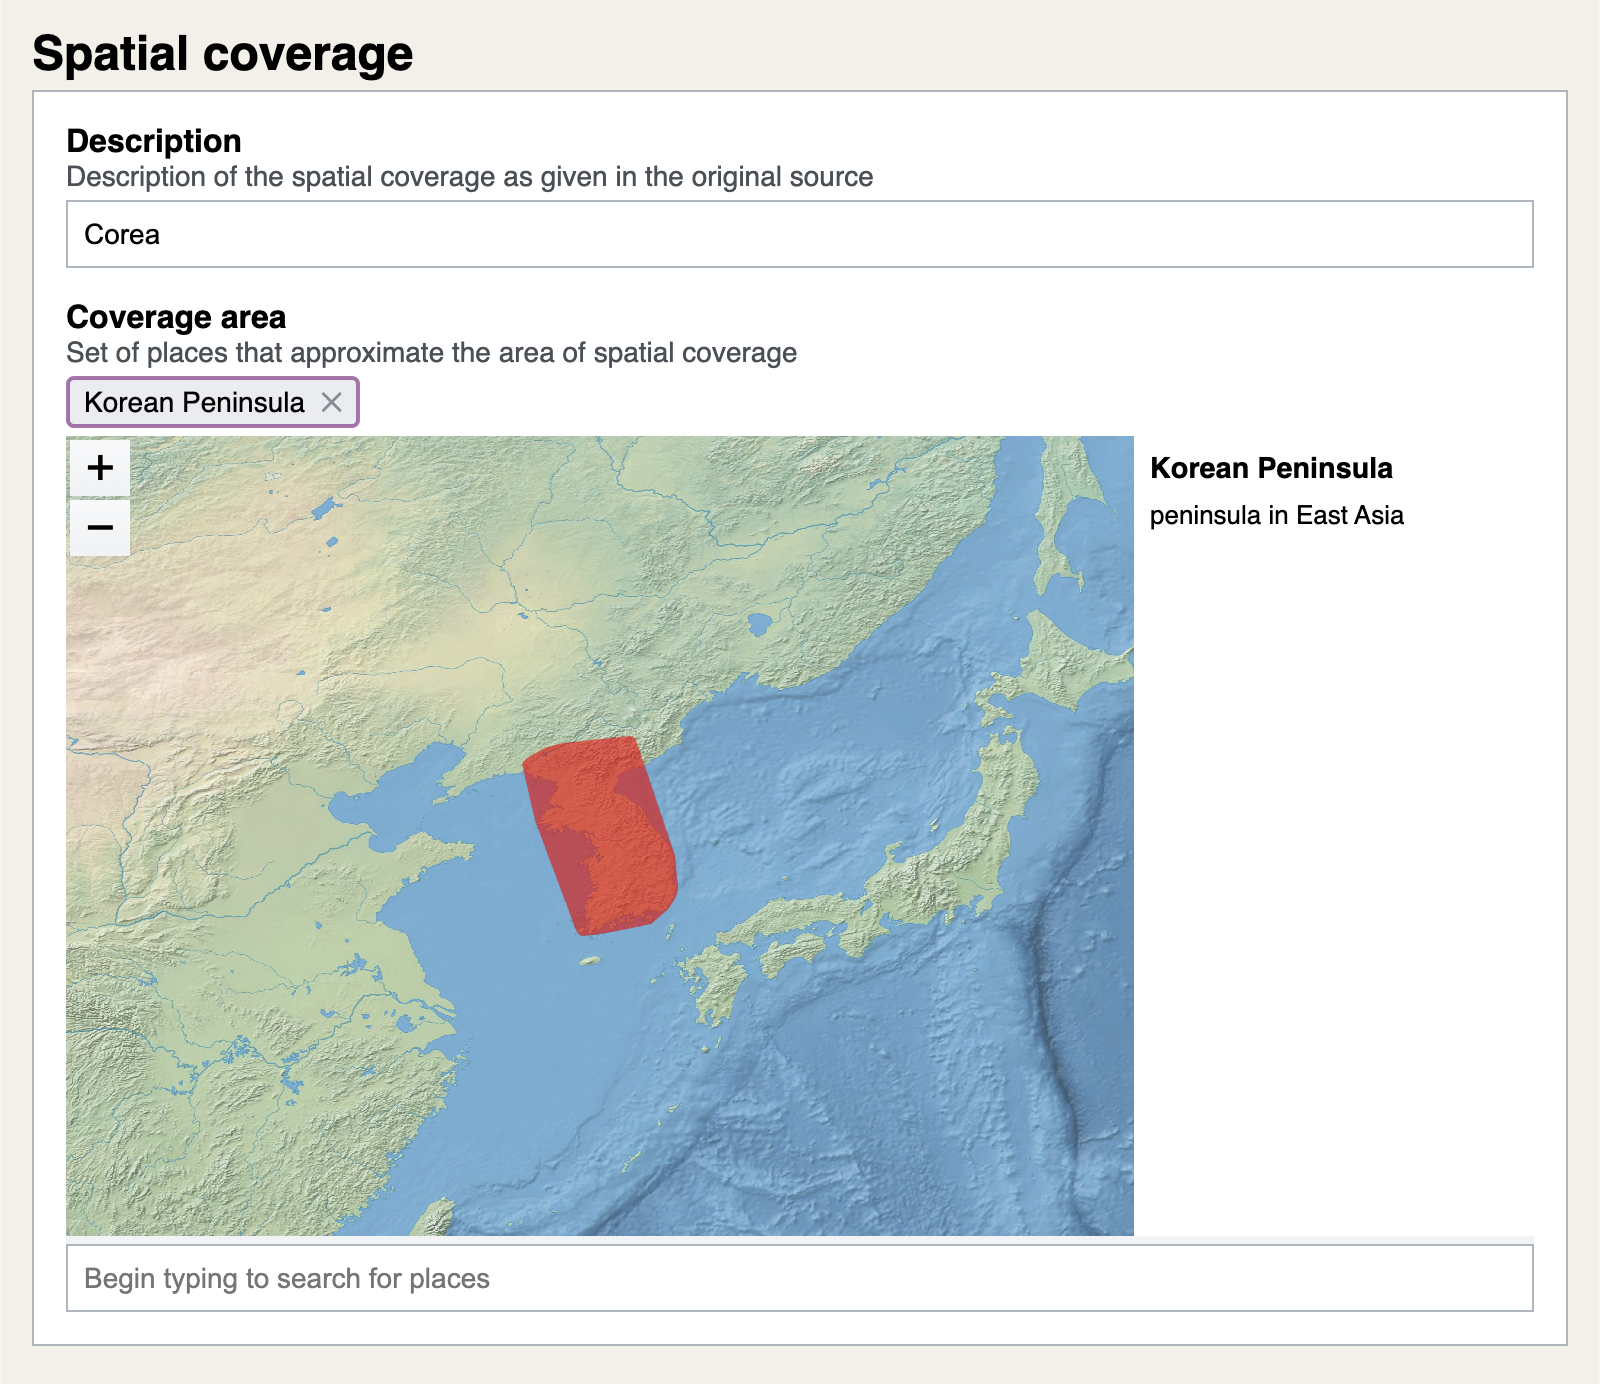
The Spatial coverage of a period can be described in two complementary ways. Under Description, give the spatial coverage as it is described in the source. This description should be taken verbatim from the text of source, in whatever form it may appear: table header, figure caption, etc. If there is absolutely no mention in the source of a spatial region to which the period is relevant, you can leave the description blank.
Under Coverage area, you can select (from placename gazetteers) specific places that correspond to the description you entered. Even if there is no mention in the source of a spatial region to which the period is relevant, you still should be able to infer such a region from what you know about the source: select places that correspond to this inferred region. The places you have selected will appear as a list of gray boxes labeled with place names. To remove a place from the list, click the X on the box.
If you cannot find a place you would like to add to the coverage area, please contact us and we’ll add it to our placename gazetteers.

have been automatically parsed into standardized forms.
To describe the Temporal coverage of a period, first look at how it is described in the source. Typically, periods will be defined as extending from some (possibly vague) Start time to some (possibly vague) Stop time. For example, a source might defined a period as extending from “1000 BCE” to “500 BCE”, or from the “end of the 1st century AD” to the “start of the 5th century”. In such cases, you would enter each part of the description—taken verbatim from the source—as the Label for the start and stop, respectively.
After you have entered a label for the start or stop of the period, the interface will attempt to automatically translate what you’ve entered into a range of standardized year values. For example, a label of “1000 BCE” would be translated to the standardized year -0999, while a label of “start of the 5th century” would be translated to the range of standardized years from 0401 to 0434.
Depending on what the label is, the interface may not be able to translate it into a standardized form. In that case, uncheck the Parse dates automatically box and enter the standardized forms yourself. If either the start or the stop of the period is a range of dates—expressing some uncertainty or vagueness about when it started or stopped—check the Year range (not a single year) box to enter that range.
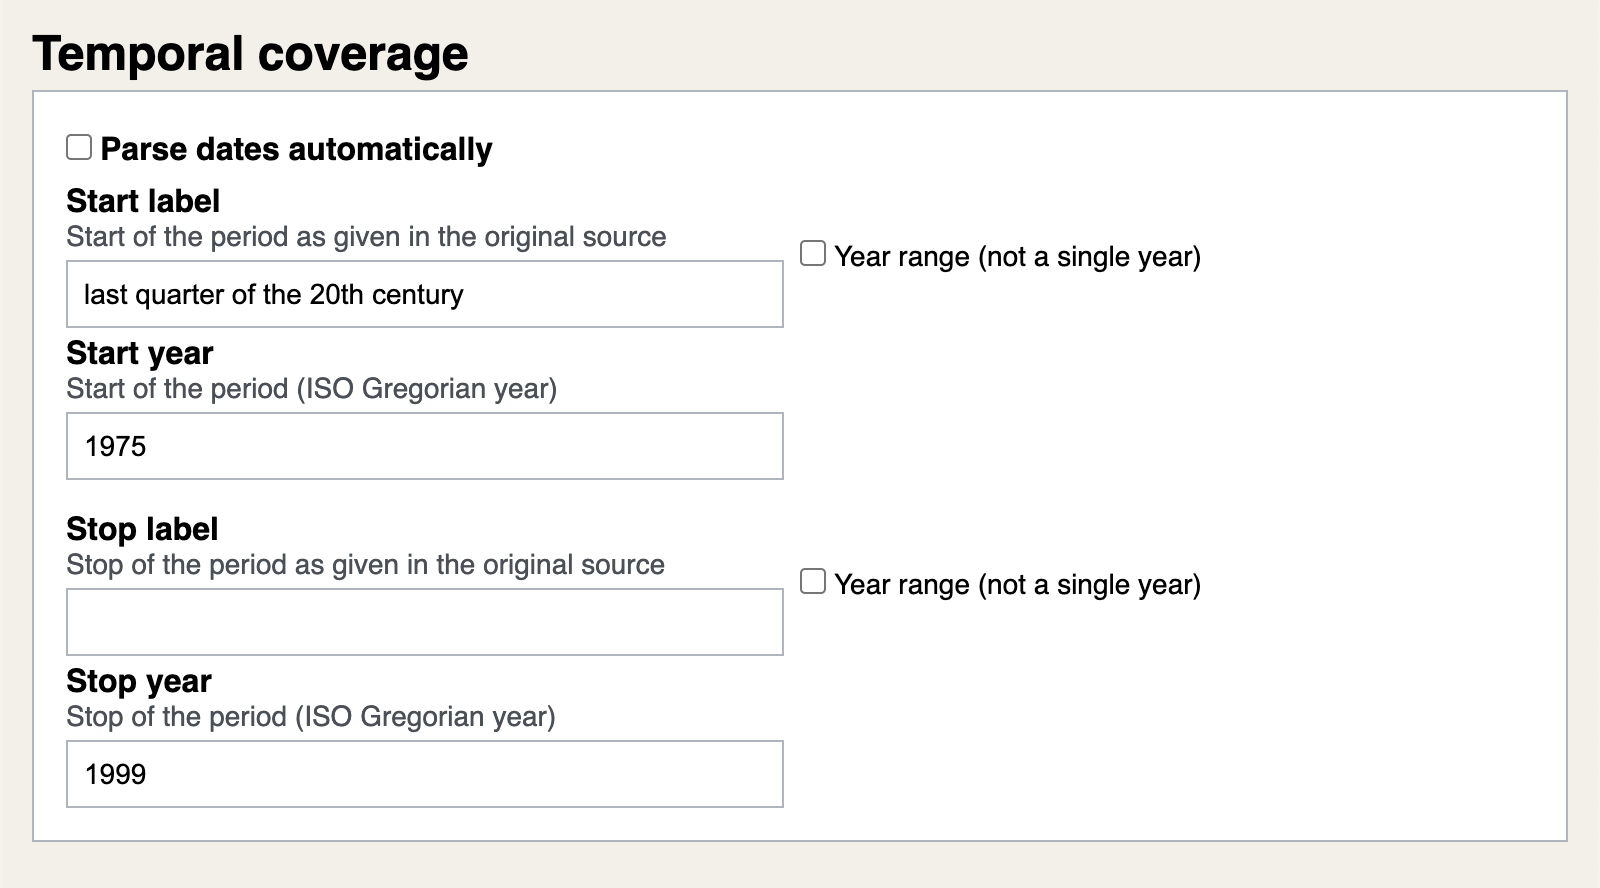
inferred from a description of temporal coverage.
In some cases a source will describe the temporal coverage of a period using a single phrase, rather than separately describing the start and the stop. In a case like this, enter the description as the label for the start, but leave the label for the stop blank. Then turn off automatic date parsing, and fill in the standardized values for the start and the stop. For example a period described as covering the “last quarter of the twentieth century” would correspond to a range from starting in 1975 and stopping in 1999, even though the textual description does not explicitly distinguish these two endpoints.
If the period is defined at a particular location in the authoritative source—for example a specific page or figure in a text—put that information in the Locator field. If the authoritative source is a website, and period is defined on a particular page in that website, put the URL of that page in the URL field.
Finally, you can add explanatory notes about the period. The Note field is for explanatory text taken directly from the source.
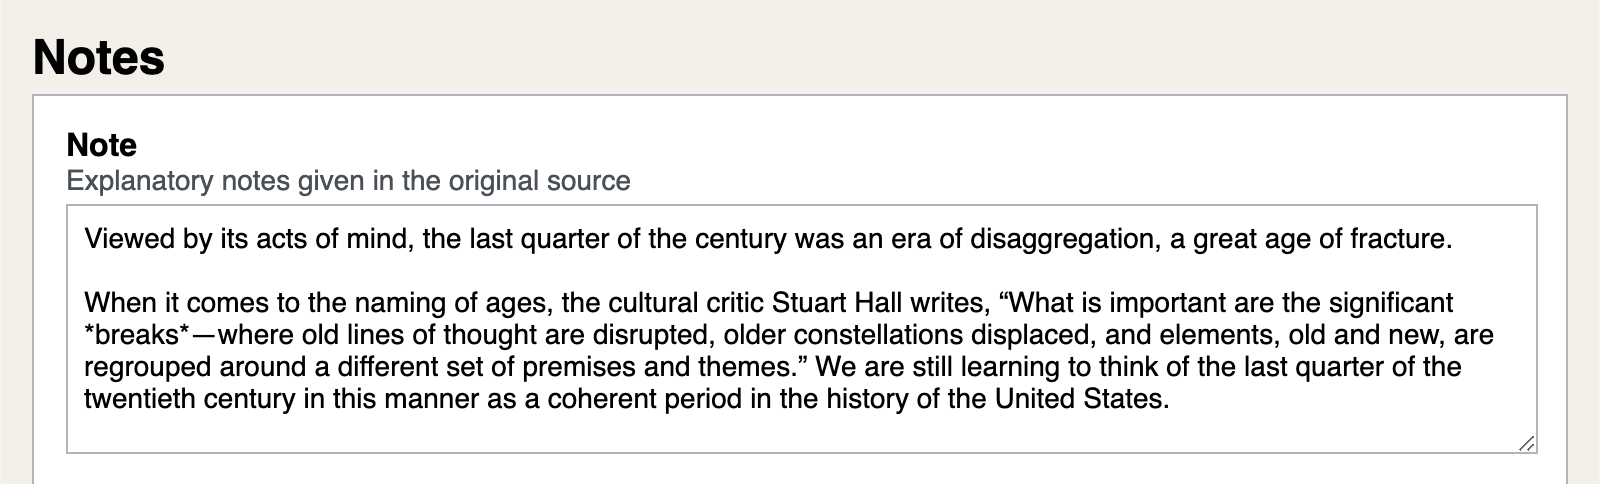
that helps one better understand the period definition
The Editorial note field is for explaining decisions made by the author of the PeriodO record (that’s you!). For example, explanations of judgment calls about alternate labels, spatial coverage, or temporal coverage could go here.
Click the Save button to finish adding your new period. You will be navigated to the authority view, which should now list your single new period.
Editing existing periods
Rather than creating your own periods and authorities from scratch, you may want to edit periods from the canonical dataset or from a file that someone shared with you. Or you may want to derive new periods from canonical ones.
To work from a file, you first need to add the file as a (read-only) data source. Navigate to Home > Data sources and under Add data source set the type to File. Give your data source a name, click Choose File, and select the file with the dataset you wish to load. Click Add and your new data source will be created.
Now you will import into your editable, in-browser database the periods you want to edit or from which you want to derive new periods. (See how to create an editable database.) Navigate to Data source > Import changes. Select from which of the Available data sources you would like to import data. If you created a new data source from a file, or if you created other in-browser data sources, you should see them listed here; otherwise you can import changes from the canonical dataset.
After you’ve made your selection, you will see a list of the differences or changes between the data source you’re currently editing and the data source from which you want to import data. If the data source you’re editing is empty, these changes will look like a list of new authorities.
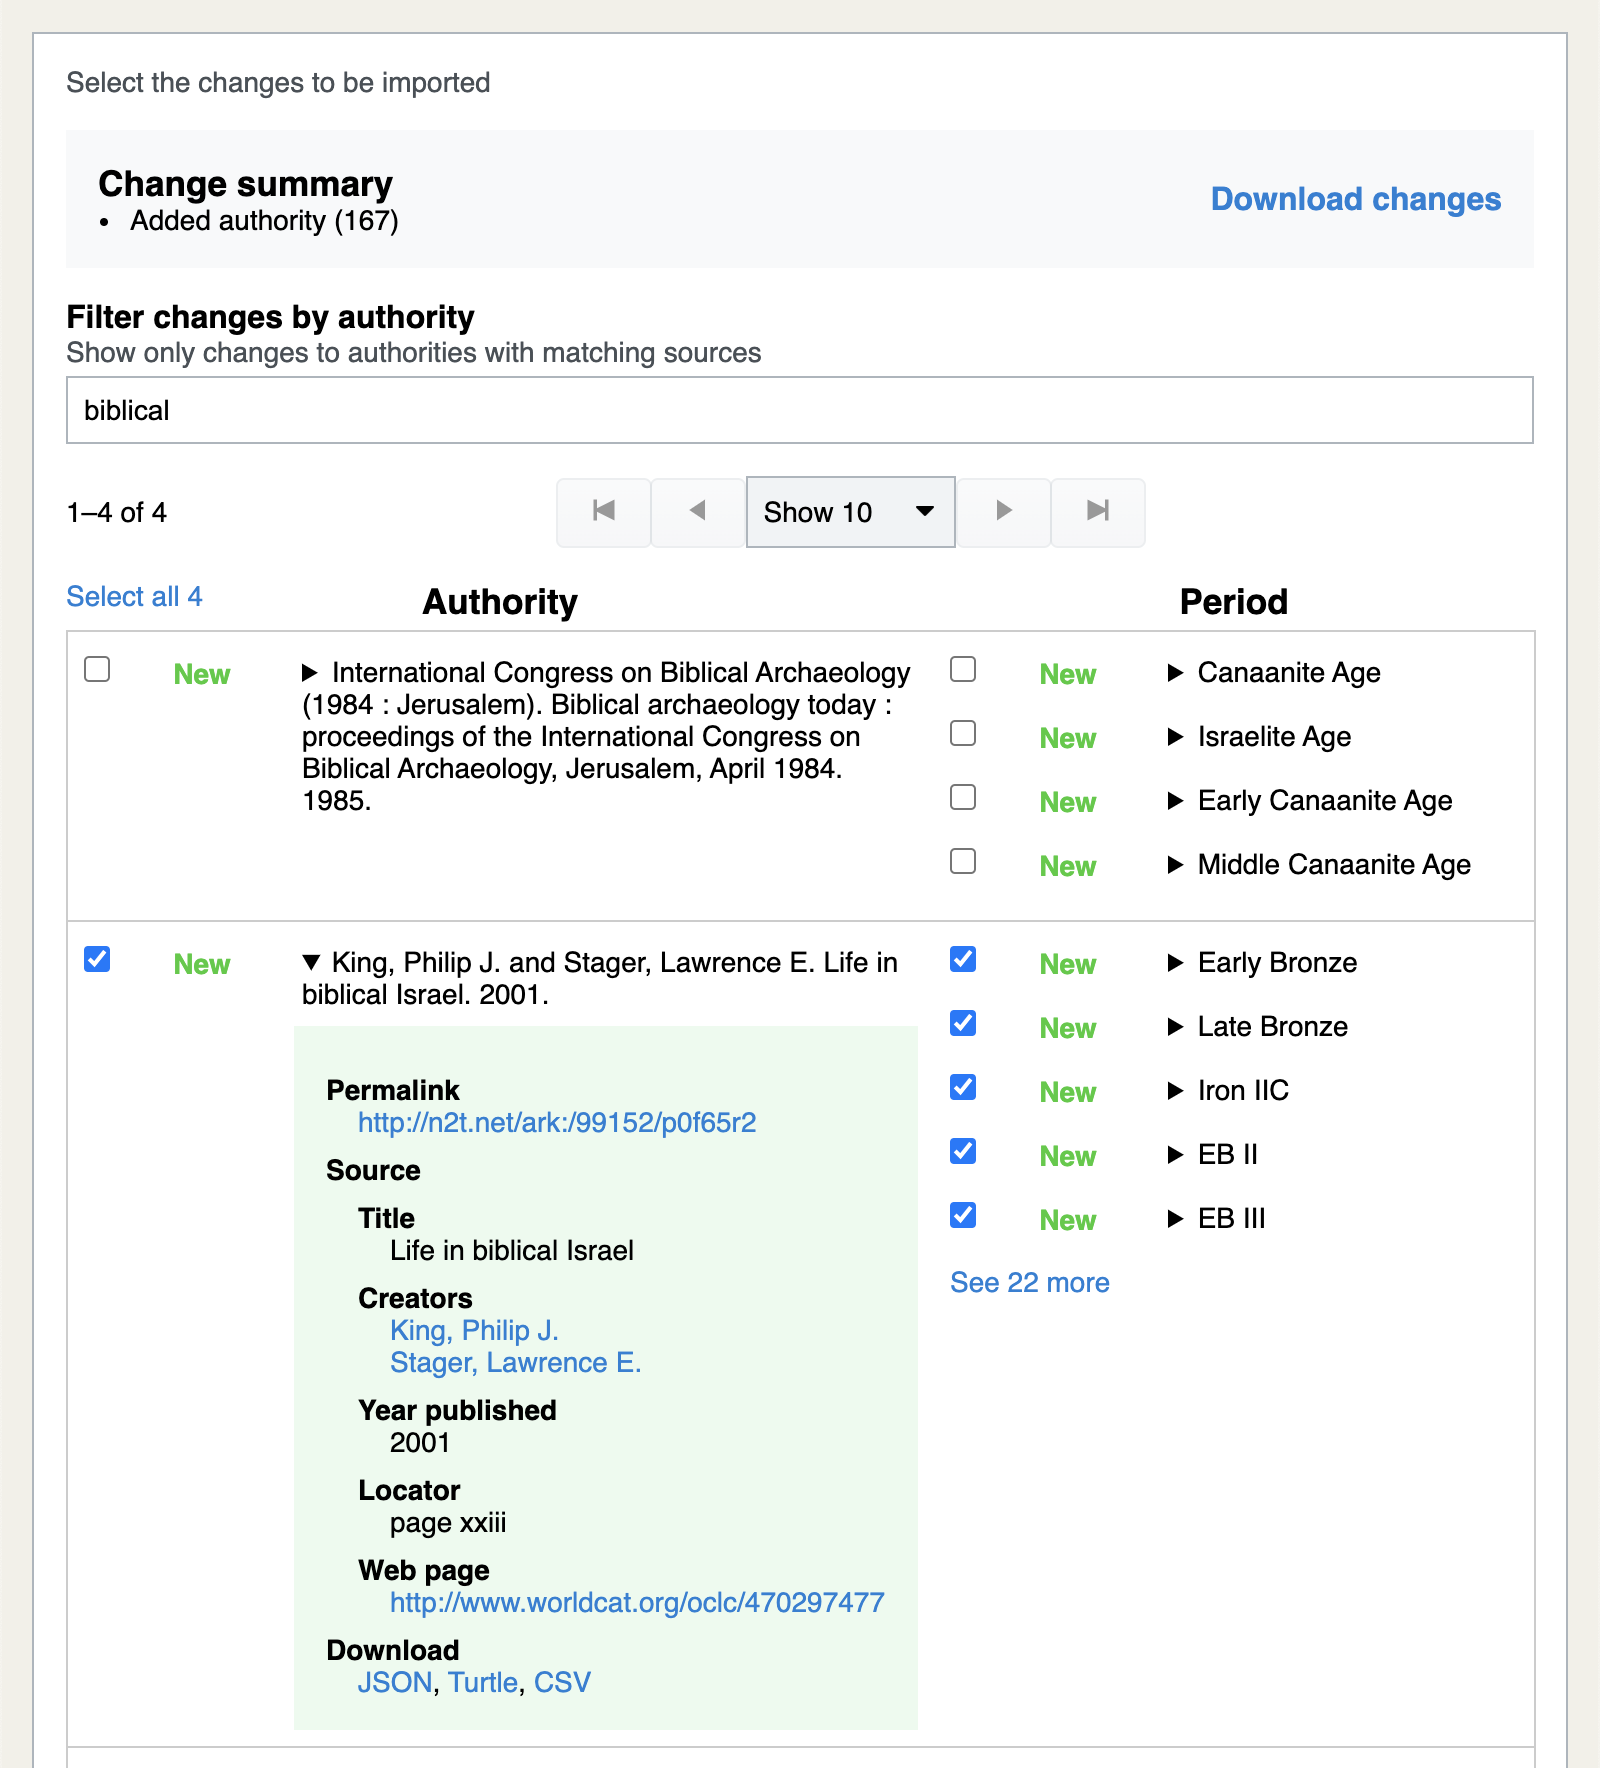
The “Life in biblical Israel” authority is selected to be imported,
and it is expanded to show the details of the authority description.
Select the changes you would like to add to the data source you’re editing, scroll down to the bottom, and click Continue. You will see a summary with only the changes you selected. Click Accept changes to confirm, and the changes will be applied. Now you can edit any period by first browsing to it and then navigating to Period > Edit. If you add a new period to this data source, you will be able to refer to the imported periods as sources from which the new period is derived.
Contribute to the canonical periods
Anyone can submit new periods or corrections to existing periods to be considered for inclusion in the canonical dataset. To do this, first either create or edit some periods. Then, navigate to Data source > Submit changes.
You will be prompted to select a web-based data source to submit your changes to. Typically this will be the canonical data source. After you’ve made your selection, you will see a Log in with your ORCID link.
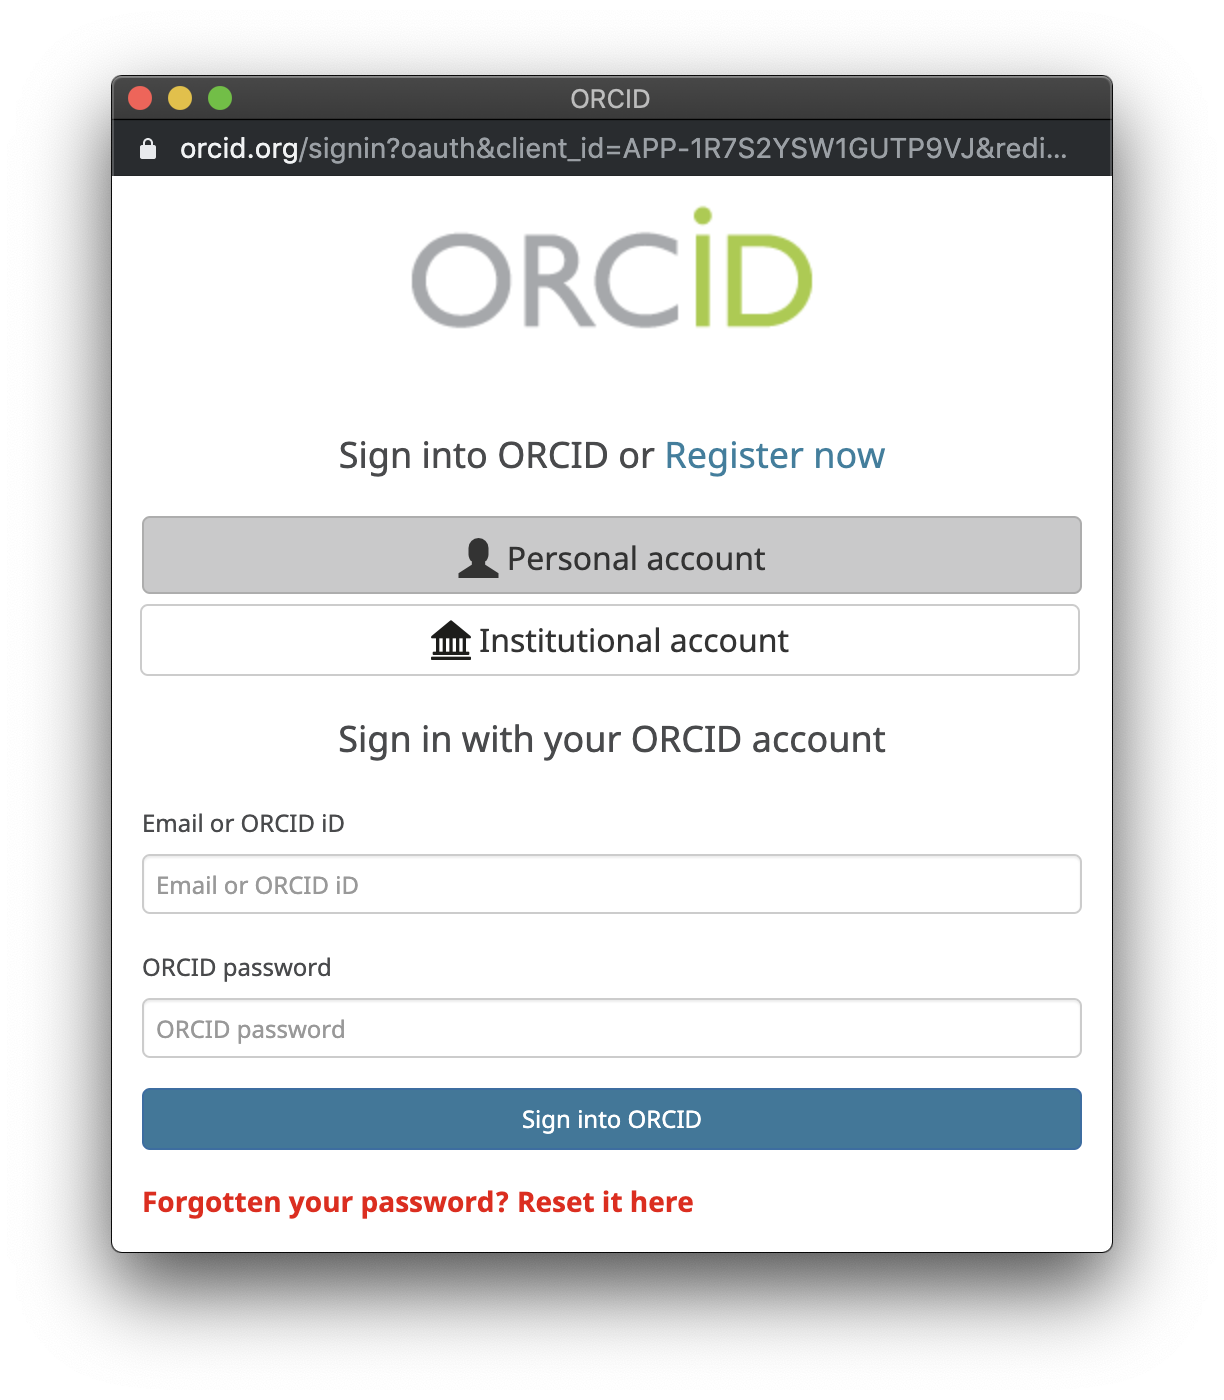
An ORCID is a unique code for identifying scholarly authors and contributors. It is free to register for an ORCID. Click the login link to enter your ORCID and ORCID account password, or to register for a new ORCID account. PeriodO will never see your ORCID account password: you are logging into orcid.org, which then provides a temporary token allowing us to authenticate you.
After successfully logging into the ORCID site, you should see the message Currently signed in as followed by whatever name you have registered with ORCID.
Click Continue to see a list of the differences or “changes” between the data source that contains your new or corrected periods and the data source to which you want to submit them.
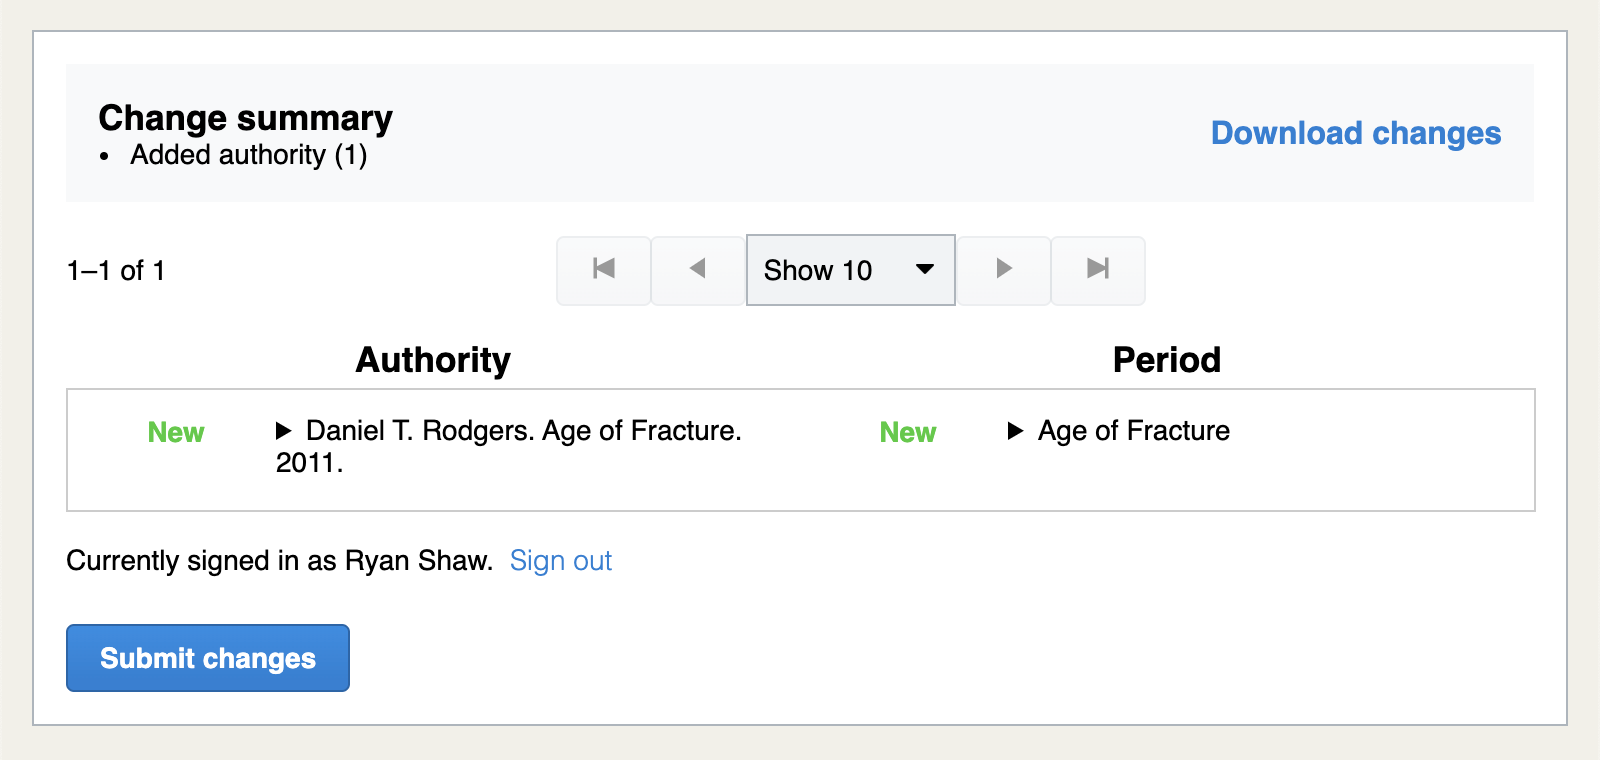
Select the changes you would like to submit, scroll down to the bottom, and click Continue. You will see a summary with only the changes you selected. Click Submit changes to confirm, and you should see the message Submitted changes. Thanks for your contribution! We will take a look at it ASAP and may contact you with questions.
To check on the status of your submission, navigate to Home > Data sources and select the web data source to which you submitted your changes (again, typically this will be the canonical data source). Then navigate to Data source > Review submitted changes to see a list of all the submissions that have been made. Your new submission should be on top (unless someone else submitted changes in the meantime). Each submission shows the date and time it was made, who made it, and its status: Open means no decision has been made, Merged means the changes were accepted, and Rejected means the changes were rejected.
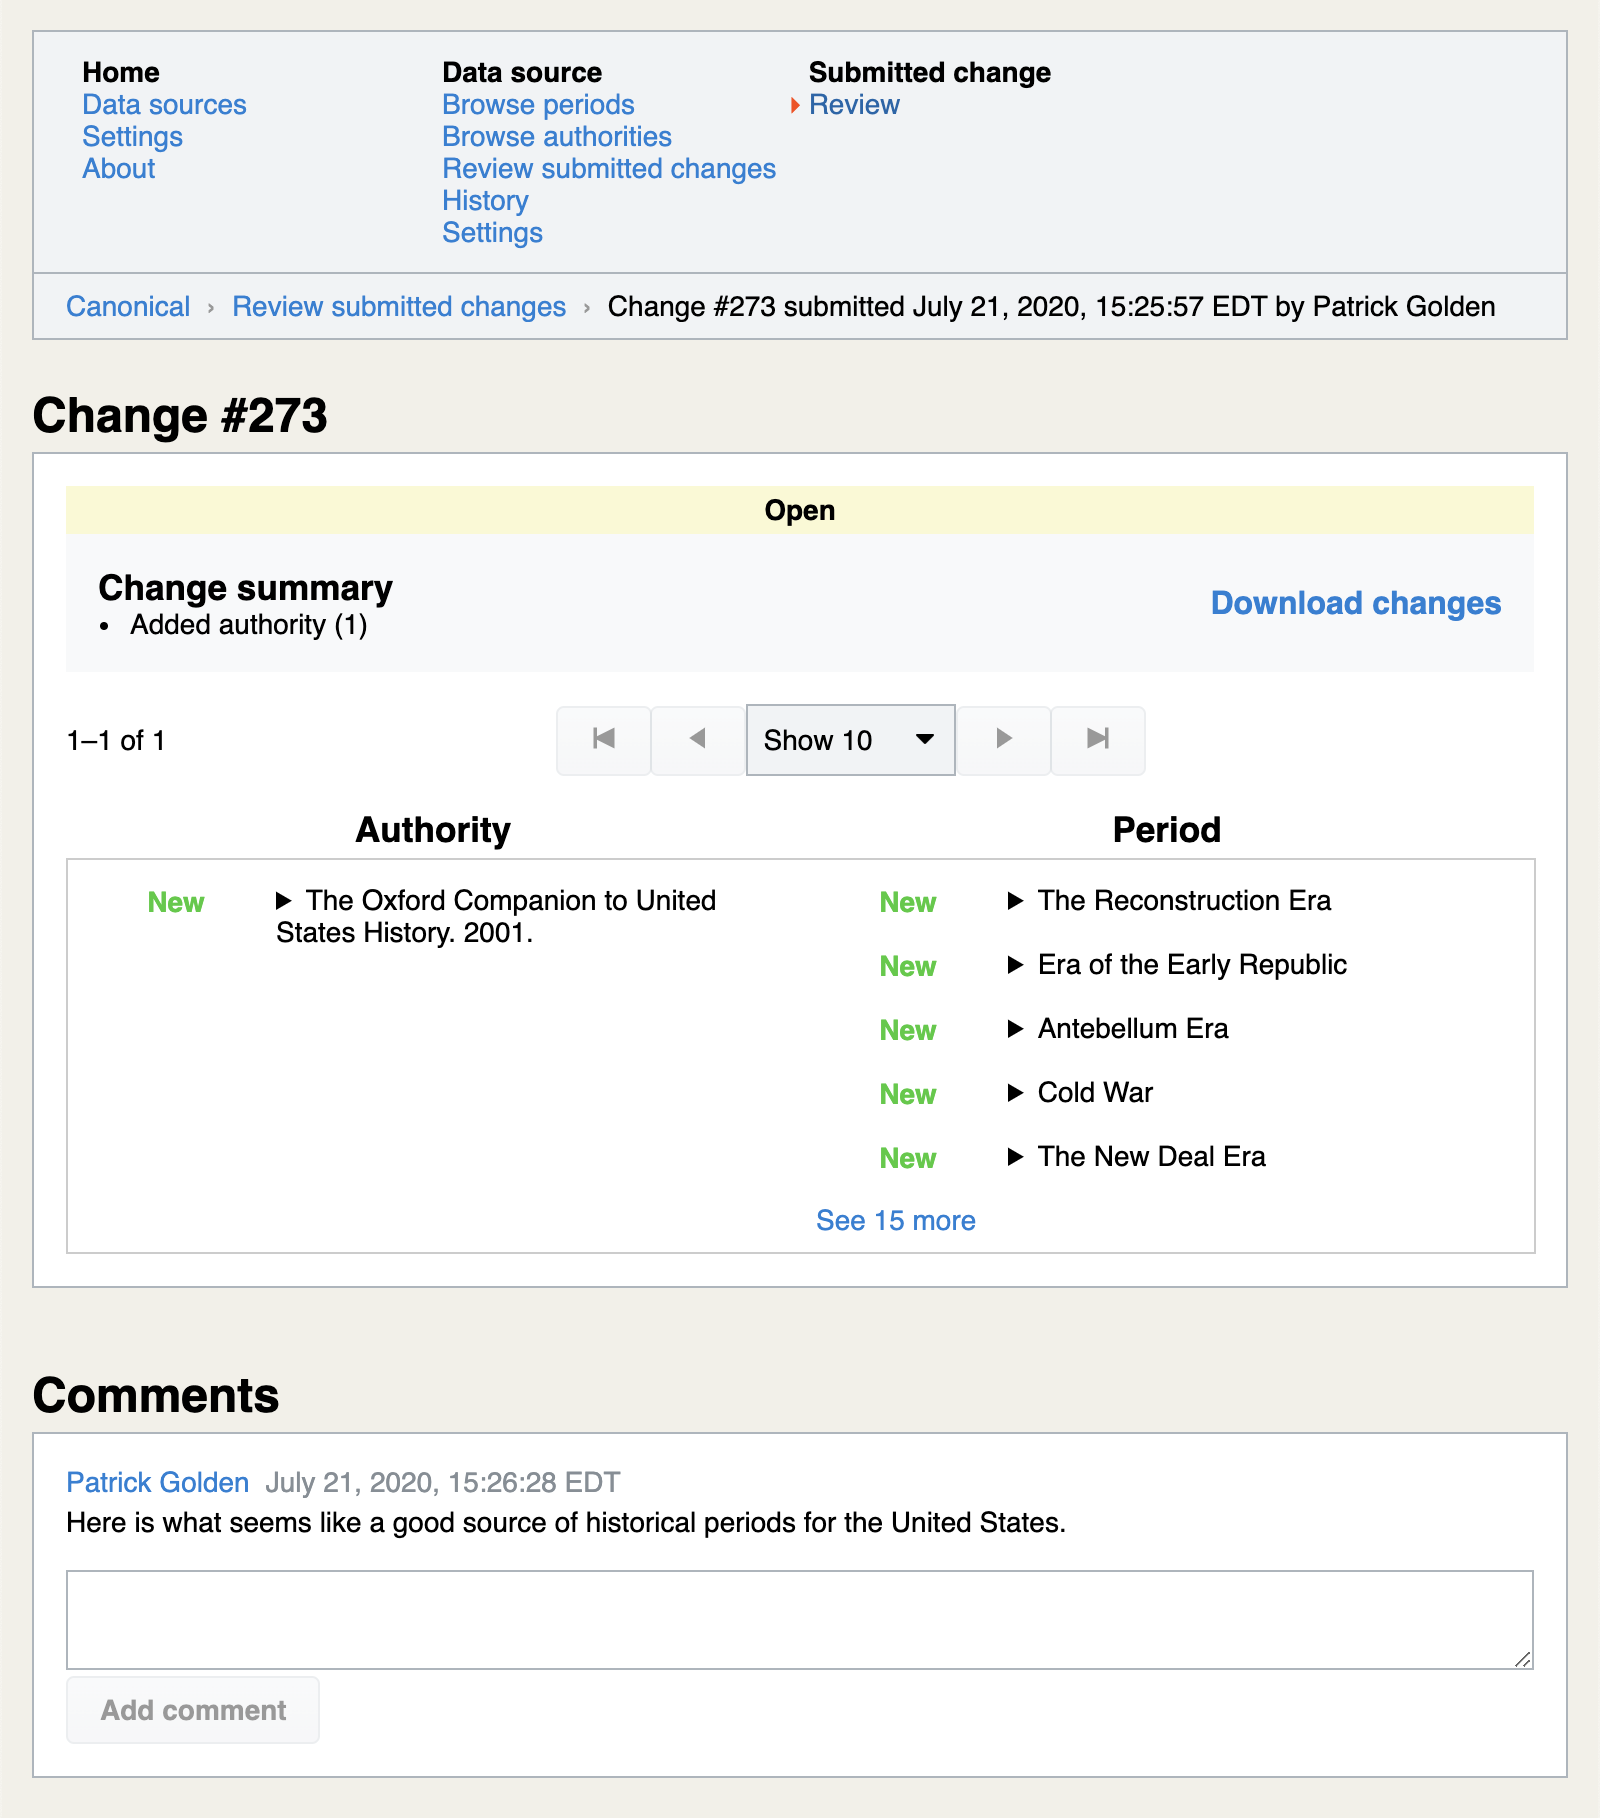
Click on a submission’s status to see any comments that have been made about the submission, or to download the submitted changes as JSON. (You may also see controls to accept or reject the changes, but unless you are authorized to make changes to the web data source to which the changes were submitted, your acceptance or rejection will fail.)